- Koa源码地址:https://github.com/koajs/koaopen in new window
- Koa 中文文档open in new window
- Koa 官方英文文档open in new window
前言
Koa是继Express后新的Node框架,由Express原班人马开发,相比Express更加简洁,源码只有2000多行,结合最新的ECMA语法,这使得Koa更小 更具有表现力 更健壮,因为每个中间件的执行结果都是Promise,结合Async Await抛弃复杂的传统回调形式。并且错误结果处理起来也更加方便
创建一个简单的Koa服务
// yarn add koa
const Koa = require('koa');
const app = new Koa();
app.use((ctx)=>{
    ctx.body = 'Hello Koa';
})
app.listen(9001,()=>{
    console.log('🎉服务开启成功,端口号为:9001')
})
1
2
3
4
5
6
7
8
9
2
3
4
5
6
7
8
9
分析源码并实现自己的Koa
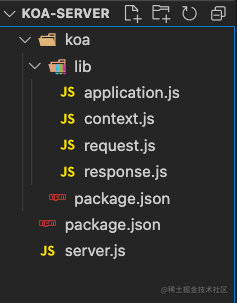
- 创建一个新的文件夹,使用npm init初始项目,package.json中添加启动命令
{
  "name": "koa-server",
  "version": "1.0.0",
  "main": "index.js",
  "scripts": {
    "serve": "nodemon server.js"
  }
}
1
2
3
4
5
6
7
8
2
3
4
5
6
7
8
- 文件夹内新建koa文件夹并使用npm init初始项目,package.json中指定入口文件
{
  "name": "koa",
  "version": "1.0.0",
  "main": "./lib/application.js"
}
1
2
3
4
5
2
3
4
5
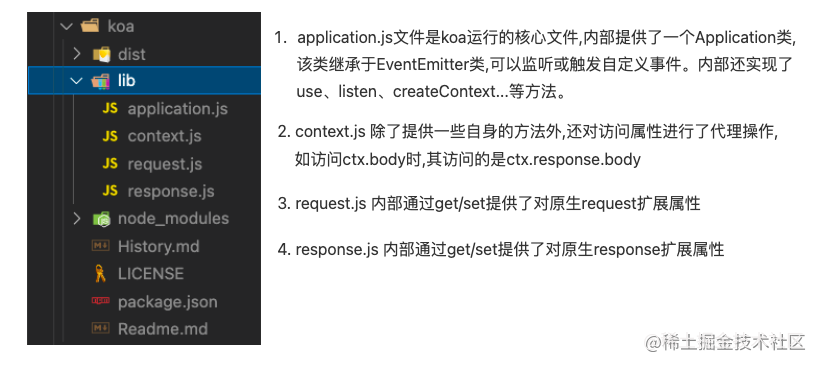
- 在koa文件中新建lib文件,在lib文件中新建application.js context.js request.js response.js
分析并实现request.js文件
Koa源码中request.js文件做了很多请求相关的参数处理,通过get/set的访问方式对属性进行了包装,使用户获取属性更加方便
//节选自:https://github.com/koajs/koa/blob/master/lib/request.js
/**
* Get request URL.
* @return {String}
* @api public
*/

get url () {
  return this.req.url
},

/**
* Set request URL.
* @api public
*/

set url (val) {
  this.req.url = val
},
1
2
3
4
5
6
7
8
9
10
11
12
13
14
15
16
17
18
19
20
2
3
4
5
6
7
8
9
10
11
12
13
14
15
16
17
18
19
20
- 实现自己的request.js
内部的this指向ctx.request, 所以ctx.request上面必须有req对象,该对象指向原生的request对象
const url = require('url');
module.exports = {
  get query() {
    const { query } = url.parse(this.req.url);
    return query;
  },
  get path() {
    const { pathname } = url.parse(this.req.url);
    return pathname;
  },
};
1
2
3
4
5
6
7
8
9
10
11
2
3
4
5
6
7
8
9
10
11
实现context.js
- context除了提供自身方法和属性外,还对其他属性进行了委托
(将请求相关的属性委托到ctx.requset上,将响应相关的属性和方法代理到ctx.response). - 用户访问ctx.body其实访问的是ctx.request.body
(后续创建上下文对象ctx时,会将request挂载到ctx身上). - delegate的原理就是
__defineGetter__,__defineSetter__属性,可以访问对象属性时,将属性委托到其他对象身上
const delegate = require('delegates');
const proto = (module.exports = {
  // 给context自身添加属性和方法
  toJSON() {
    return {};
  },
});

// 当直接访问ctx.xx时 委托到ctx.response.xx身上
delegate(proto, 'response')
  .access('body')
  .access('status');

// 当直接访问ctx.xx时 委托到ctx.request.xx身上
delegate(proto, 'request')
  .access('query')
  .access('path')
  .access('url');
1
2
3
4
5
6
7
8
9
10
11
12
13
14
15
16
17
18
19
2
3
4
5
6
7
8
9
10
11
12
13
14
15
16
17
18
19
delegatesopen in new window是一个对象访问代理的JS库。
defineGetteropen in new window方法可以将一个函数绑定在当前对象的指定属性上,当那个属性被读取时,就调用这个绑定的方法。(其实可以使用Object.defineProperty、对象的get/set、proxy代替)
- delegate内部也是通过__defineGetter__, __defineSetter__两种方法实现的属性委托
- 上面的context实现方式, 也可以通过下面__defineGetter__, __defineSetter__直接实现
const proto = (module.exports = {
  // 给context自身添加属性和方法
  toJSON() {
    return {};
  },
});
function defineGetters(taregt, key) {
  proto.__defineGetter__(key, function() {
    return this[taregt][key];
  });
}
defineGetters('request', 'query');
defineGetters('request', 'path');
defineGetters('request', 'url');
defineGetters('response', 'body');
defineGetters('response', 'status');

function defineSetters(target, key) {
  proto.__defineSetter__(key, function(value) {
    this[target][key] = value;
  });
}
defineSetters('response', 'body');
defineSetters('response', 'status');
1
2
3
4
5
6
7
8
9
10
11
12
13
14
15
16
17
18
19
20
21
22
23
24
2
3
4
5
6
7
8
9
10
11
12
13
14
15
16
17
18
19
20
21
22
23
24
分析并实现response.js
将cxt.header代理到this.res.header上。
// https://github.com/koajs/koa/blob/master/lib/response.js
/**
   * Return response header.
   *
   * @return {Object}
   * @api public
   */

  get header () {
    const { res } = this
    return typeof res.getHeaders === 'function'
      ? res.getHeaders()
      : res._headers || {} // Node < 7.7
  },

  /**
   * Return response header, alias as response.header
   *
   * @return {Object}
   * @api public
   */

  get headers () {
    return this.header
  },

  /**
   * Get response status code.
   *
   * @return {Number}
   * @api public
   */

  get status () {
    return this.res.statusCode
  },
1
2
3
4
5
6
7
8
9
10
11
12
13
14
15
16
17
18
19
20
21
22
23
24
25
26
27
28
29
30
31
32
33
34
35
36
2
3
4
5
6
7
8
9
10
11
12
13
14
15
16
17
18
19
20
21
22
23
24
25
26
27
28
29
30
31
32
33
34
35
36
- response内部通过get set 提供了很多响应相关的属性和方法
- 简单实现自己的response.js
const response = {
  _body: undefined,
  get body() {
    return this._body;
  },
  set body(value) {
    this._body = value;
  },
  get status() {
    return this.res.statusCode;
  },
  set status(code) {
    this.res.statusCode = code;
  },
};
module.exports = response;
1
2
3
4
5
6
7
8
9
10
11
12
13
14
15
16
2
3
4
5
6
7
8
9
10
11
12
13
14
15
16
剖析application源码并实现它
(1)构造函数
- 继承Events函数,可以直接订阅或发布事件
- 通过Object.create()分别创建context,request,response对象,目的是为了基于原型链创建一个新对象,避免全局中多个程序造成对象引用污染
- 创建中报错间件的集合middleware
module.exports = class Application extends EventEmitter {
  constructor() {
    super();
    // 创建全新的context request response对象
    this.context = Object.create(context);
    this.request = Object.create(request);
    this.response = Object.create(response);
    // 保存中间件的数组
    this.middleware = [];
  }
}
1
2
3
4
5
6
7
8
9
10
11
2
3
4
5
6
7
8
9
10
11
(2)use()
- 验证并添加中间件
use(fn) {
    if (typeof fn !== 'function') throw new TypeError('middleware must be a function!');
    // 将注册的中间件添加到数组中管理
    this.middleware.push(fn);
 }
1
2
3
4
5
2
3
4
5
(3)listen()
通过http创建server,通过this.callback完成回调
listen(...args) {
  const server = http.createServer(this.callback());
  return server.listen(...args);
}
1
2
3
4
2
3
4
(4)callback()
- 通过调用compose包装中间件,返回一个可执行的函数,调用该函数则开始执行中间件
- 创建请求相关的处理函数,内部创建全局上下文对象ctx,将ctx和中间件的调用函数交给this.handleRequest函数处理
callback() {
  // fn函数内部将执行注册的中间件
  const fn = this.compose();
  // 处理request请求
  const handleRequest = (req, res) => {
    // 创建上下文对象ctx
    const ctx = this.createContext(req, res);
    this.handleRequest(ctx, fn);
  };
  return handleRequest;
}
1
2
3
4
5
6
7
8
9
10
11
2
3
4
5
6
7
8
9
10
11
(5)compose()
- 默认直接执行第一个中间件
- 没有中间件或中间件执行完毕直接返回成功的结果
- 记录上一个中间件的索引index,防止一个中间件内多次调用next()
- 递归调用dispatch(),中间件的第一个参数是ctx对象,第二个参数next为 dispatch(i+1)
compose() {
  // 每个中间价必须是个方法
  for (const fn of this.middleware) {
    if (typeof fn !== 'function')
      throw new TypeError('Middleware must be composed of functions!');
  }
  // 开始执行中间件
  return ctx => {
    // 上一个中间件的索引
    let index = -1;
    const dispatch = i => {
      // 防止中间内多次调用next函数
      if (i <= index) return Promise.reject(new Error('next() called multiple times'));
      index = i;
      // 没有中间件 或执行完最后一个中间件 直接返回成功
      if (this.middleware.length === i) return Promise.resolve();
      let fn = this.middleware[i];
      try {
        // next 函数内部调用了dispatch,并且直接执行下一个中间件
        let next = () => dispatch.bind(null, i + 1);
        return Promise.resolve(fn(ctx, next()));
      } catch (err) {
        return Promise.reject(err);
      }
    };
    // 默认直接执行第一个中间件
    return dispatch(0);
  };
}
1
2
3
4
5
6
7
8
9
10
11
12
13
14
15
16
17
18
19
20
21
22
23
24
25
26
27
28
29
2
3
4
5
6
7
8
9
10
11
12
13
14
15
16
17
18
19
20
21
22
23
24
25
26
27
28
29
(6)createContext()
每一个请求都需要有一个全新的上下文对象,通过Object.create创建
将request,response对象挂载到上下对象ctx身上,方便通过__defineGetter__和__defineSetter__进行属性委托
createContext(req, res) {
  // 基于原型链创建新的ctx request response(避免不同的请求污染)
  const ctx = Object.create(this.context);
  const request = Object.create(this.request);
  const response = Object.create(this.response);
  ctx.request = request; // 上下文对象中保存包装后的request对象
  ctx.request.req = ctx.req = req; // 将原生的request对象分别挂载到 ctx.request 和 ctx上
  ctx.response = response; // 上下文对象中保存包装后的response对象
  ctx.response.res = ctx.res = res; // 将原生的response对象分别挂载到 ctx.response 和 ctx上
  return ctx;
}
1
2
3
4
5
6
7
8
9
10
11
2
3
4
5
6
7
8
9
10
11
(7)handleRequest()
- 创建默认的状态码
- 执行全部中间件
handleRequest(ctx, fn) {
  // 默认的状态码
  ctx.res.statusCode = 404;
  // 不同情况的响应处理
  const handleResponse = () => this.respond(ctx)
  // 执行中间件 全部中间件成功执行完毕 执行respond响应结果
  fn(ctx)
    .then(handleResponse)
    .catch(err => {
      this.emit('error', err);
    });
}
1
2
3
4
5
6
7
8
9
10
11
12
2
3
4
5
6
7
8
9
10
11
12
(8)respond()
respond(ctx) {
  // [1] 这里上下文对象的body其实是代理的response对象中的body
  // [2] ctx.body ==== ctx.response.body
  // [3] Koa源码中使用delegate函数完成代理 (__defineGetter__ , __defineSetter__)
  const body = ctx.body || 'Not Define';
  return ctx.res.end(body);
}
1
2
3
4
5
6
7
2
3
4
5
6
7