TypeScript
TypeScript 是什么
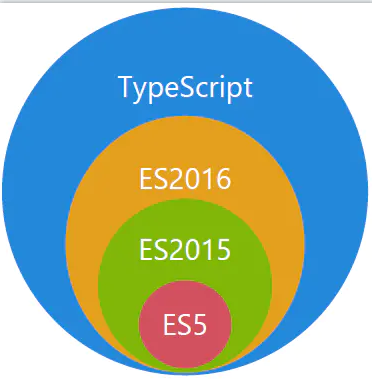
TypeScript 是 JavaScript 的超集
如何使用
npm install -g typescript # 下载
tsc xx.ts # 生成 xx.js 文件
2
太麻烦?线上直接上手 TypeScript Playopen in new window
配合阮老师的 ES6 入门教程-阮一峰open in new window 、TypeScript 入门指南-阮一峰open in new window一起食用效果更佳!
基础类型
Number
let num: number = 10;1Any
let notSure: any = "xxx";1Boolean
let isDone: boolean = false;1String
let str: string = "str..";1Array
let arr: number[] = [1, 2, 3];1Enum
enum Direction {
  NORTH,
  SOUTH,
  EAST,
  WEST,
}
let dir: Direction = Direction.NORTH;
1
2
3
4
5
6
7Tuple
let tupleType: [string, boolean];
tupleType = ["Semlinker", true];
1
2Void
let unusable: void = undefined;1UnKnown
let value: unknown;
value = true;
valeu = 10;
value = "bobo";
1
2
3
4Null
let n: null = null;1Undefined
let u: undefined = undefined;1Never
function fn(x: string | number) {
  if (typeof x === "string") {
    // ...
  } else if (typeof x === "number") {
    // ...
  } else {
    x; // never 类型
  }
}
2
3
4
5
6
7
8
9
Object
interface Person {
  name: string;
  age: number;
}
let tom: Person = {
  name: "Tom",
  age: 25,
};
1
2
3
4
5
6
7
8Number 和 number 的区别是,包装对象基础类型的区别。前者代表的是
new Number(1), 后者代表的是1, String、Boolean 也是一样Object 和 object 区别也是一样,但是 Object 包括 Function、Array,而 object 只表示
{}联合类型,反之有交叉类型,使用 & 链接
// 联合类型
let value: string | number = 666;

// 交叉类型
let obj: { foo: string } & { bar: string };

obj = {
  foo: "hello",
  bar: "world",
};
2
3
4
5
6
7
8
9
10
- 顶级类型和底层类型
- 从集合论的角度看,any 类型可以看成是所有其他类型的全集,包含了一切可能的类型。TypeScript 将这种类型称为“顶层类型”(top type),意为涵盖了所有下层。
- 在集合论上,unknown 也可以视为所有其他类型(除了 any)的全集,所以它和 any 一样,也属于 TypeScript 的顶层类型。
- TypeScript 就相应规定,任何类型都包含了 never 类型。因此,never 类型是任何其他类型所共有的,TypeScript 把这种情况称为“底层类型”(bottom type)。
- 总之,TypeScript 有两个“顶层类型”(any 和 unknown),但是“底层类型”只有 never 唯一一个。
数组(Array)
// 普通类型
const arr1: number[] = [1, 2, 3];

// 联合类型
const arr2: (string | number)[] = [1, "2"];
// 也可以写成
const arr3: Array<number | string> = [1];

// 任意类型
const arr4: any[] = [false, 2, arr3];

// 只读数组
const arr5: readonly number[] = [1, 2, 3];

arr5.push(4); // 报错:Property 'push' does not exist on type 'readonly number[]'.

// 多维数组 number 表示的是最底层数组成员的类型
const multi: number[][] = [
  [1, 2, 3],
  [4, 5, 6],
];
2
3
4
5
6
7
8
9
10
11
12
13
14
15
16
17
18
19
20
21
元组(tuple)
元组必须明确声明每个成员的类型
数组于元组的区别
// 数组
let a: number[] = [1];

// 元组
let t: [number] = [1];
2
3
4
5
使用扩展运算符(...),可以表示不限成员数量的元组。
type NamedNums = [string, ...number[]];

const a: NamedNums = ["A", 1, 2];
const b: NamedNums = ["B", 1, 2, 3];
2
3
4
可以通过 readonly 设置只读元组
Enum
Enum 结构比较适合的场景是,成员的值不重要,名字更重要,从而增加代码的可读性和可维护性。
enum Color {
  Red, // 0
  Green, // 1
  Blue, // 2
}
2
3
4
5
上面示例声明了一个 Enum 结构 Color,里面包含三个成员 Red、Green 和 Blue。第一个成员的值默认为整数 0,第二个为 1,第三个为 2,以此类推。
使用时,调用 Enum 的某个成员,与调用对象属性的写法一样,可以使用点运算符,也可以使用方括号运算符。
let c = Color.Green; // 1
// 等同于
let c = Color["Green"]; // 1
2
3
Enum 结构本身也是一种类型。比如,上例的变量 c 等于 1,它的类型可以是 Color,也可以是 number。
Enum 成员默认不必赋值,系统会从零开始逐一递增,按照顺序为每个成员赋值,比如 0、1、2……
但是,也可以为 Enum 成员显式赋值,比如赋值为字符串。
enum Direction {
  Up = "UP",
  Down = "DOWN",
  Left = "LEFT",
  Right = "RIGHT",
}
2
3
4
5
6
上面示例中,Direction 就是字符串枚举,每个成员的值都是字符串。
注意,字符串枚举的所有成员值,都必须显式设置。如果没有设置,成员值默认为数值,且位置必须在字符串成员之前。
对象(Object)
// 写法一
type MyObj = {
  x: number;
  y: number;
};

const obj: MyObj = { x: 1, y: 1 };

// 写法二
interface MyObj {
  x: number;
  y: number;
}

const obj: MyObj = { x: 1, y: 1 };
2
3
4
5
6
7
8
9
10
11
12
13
14
15
可选属性
type User = {
  firstName: string;
  lastName?: string;
};

// 等同于
type User = {
  firstName: string;
  lastName?: string | undefined;
};
2
3
4
5
6
7
8
9
10
只读属性
type Point = {
  readonly x: number;
  readonly y: number;
};

const p: Point = { x: 0, y: 0 };

p.x = 100; // 报错
2
3
4
5
6
7
8
属性名的索引类型
如果对象的属性非常多,一个个声明类型就很麻烦,而且有些时候,无法事前知道对象会有多少属性,比如外部 API 返回的对象。这时 TypeScript 允许采用属性名表达式的写法来描述类型,称为“属性名的索引类型”。
索引类型里面,最常见的就是属性名的字符串索引。
type MyObj = {
  [property: string]: string;
};

const obj: MyObj = {
  foo: "a",
  bar: "b",
  baz: "c",
};
2
3
4
5
6
7
8
9
上面示例中,类型 MyObj 的属性名类型就采用了表达式形式,写在方括号里面。[property: string]的 property 表示属性名,这个是可以随便起的,它的类型是 string,即属性名类型为 string。也就是说,不管这个对象有多少属性,只要属性名为字符串,且属性值也是字符串,就符合这个类型声明。
接口(Interface)
接口是对值的名称和类型做检查
定义
interface Person {
  name: string;
  readonly age: number;
  girlFirend?: string;
  say: (words: string) => string;
  [propName: string]: any;
}
2
3
4
5
6
7
- 可选属性加
? - 只读属性加
readonly - 函数
(value: type) => returType - 会有额外的属性
[propName: string]: any
使用
function getPerson(person: Person) {
  console.log(`我叫 ${person.name}, 今年 ${person.age}, 来自 ${person.from},${person.say("英语")}`);
}

let Tom = { name: "Tom", age: 23, from: "China", say: (words: string) => `我会说:${words}` };
getPerson(Tom); // "我叫 Tom, 今年 23, 来自 China,我会说:英语"
2
3
4
5
6
函数接受的参数必须满足接口类型的要求。
5 种语法形式
对象属性 见定义 对象的属性索引 见定义 对象方法 见定义 函数 interface 也可以用来声明独立的函数。
interface Add {
  (x: number, y: number): number;
}

const myAdd: Add = (x, y) => x + y;
2
3
4
5
构造函数 interface 内部可以使用 new 关键字,表示构造函数。
interface ErrorConstructor {
  new (message?: string): Error;
}
2
3
上面示例中,接口 ErrorConstructor 内部有 new 命令,表示它是一个构造函数。
interface 的继承
interface 继承 interface interface 可以使用 extends 关键字,继承其他 interface。
interface Shape {
  name: string;
}

interface Circle extends Shape {
  radius: number;
}
2
3
4
5
6
7
上面示例中,Circle 继承了 Shape,所以 Circle 其实有两个属性 name 和 radius。这时,Circle 是子接口,Shape 是父接口。
extends 关键字会从继承的接口里面拷贝属性类型,这样就不必书写重复的属性。
interface 继承 type interface 可以继承 type 命令定义的对象类型。
type Country = {
  name: string;
  capital: string;
};

interface CountryWithPop extends Country {
  population: number;
}
2
3
4
5
6
7
8
上面示例中,CountryWithPop 继承了 type 命令定义的 Country 对象,并且新增了一个 population 属性。
注意,如果 type 命令定义的类型不是对象,interface 就无法继承。
接口合并
多个同名接口会合并成一个接口。
interface Box {
  height: number;
  width: number;
}

interface Box {
  length: number;
}
2
3
4
5
6
7
8
上面示例中,两个 Box 接口会合并成一个接口,同时有 height、width 和 length 三个属性。
这样的设计主要是为了兼容 JavaScript 的行为。JavaScript 开发者常常对全局对象或者外部库,添加自己的属性和方法。那么,只要使用 interface 给出这些自定义属性和方法的类型,就能自动跟原始的 interface 合并,使得扩展外部类型非常方便。
举例来说,Web 网页开发经常会对 windows 对象和 document 对象添加自定义属性,但是 TypeScript 会报错,因为原始定义没有这些属性。解决方法就是把自定义属性写成 interface,合并进原始定义。
interface Document {
  foo: string;
}

document.foo = "hello";
2
3
4
5
上面示例中,接口 Document 增加了一个自定义属性 foo,从而就可以在 document 对象上使用自定义属性。
同名接口合并时,同一个属性如果有多个类型声明,彼此不能有类型冲突。
interface A {
  a: number;
}

interface A {
  a: string; // 报错
}
2
3
4
5
6
7
Type 和 interface 的区别
- 使用范围不同:Type 可以用来声明所有类型,包括非对象类型,而 Interface 只能用来声明对象类型。
- 声明对象时:Interface 可以多次声明同一个接口,而 Type 定义的是别名,别名不能重复。
- 继承方面:Interface 支持继承,Type 不支持。
- 表示类型:Type 可以表示非对象类型,Interface 只能表示对象类型。
- 合并方面:Interface 可以声明合并,Type 不可以。
- type 可以扩展原始数据类型,interface 不行。
- this 关键字只能用于 interface。
- interface 不能包含属性映射(mapping),type 可以。
综上所述,如果有复杂的类型运算,那么没有其他选择只能使用 type;一般情况下,interface 灵活性比较高,便于扩充类型或自动合并,建议优先使用。
类(class)
定义
class Greeter {
  greeting: string;
  constructor(message: string) {
    this.greeting = message;
  }
  greet() {
    return "Hello, " + this.greeting;
  }
}

let greeter = new Greeter("world");
2
3
4
5
6
7
8
9
10
11
get set
继承
和 ES6 基本一致
class Animal {
  move(distanceInMeters = 0) {
    console.log(`Animal moved ${distanceInMeters}m.`);
  }
}
class Dog extends Animal {
  constructor(name) {
    super();
    this.name = name;
  }
  bark() {
    console.log("Woof! Woof!");
  }
}
const dog = new Dog("dog");
dog.bark();
dog.move(10);
dog.bark();
2
3
4
5
6
7
8
9
10
11
12
13
14
15
16
17
18
抽象类
TypeScript 允许在类的定义前面,加上关键字 abstract,表示该类不能被实例化,只能当作其他类的模板。这种类就叫做“抽象类”(abstract class)。 抽象类只能当作基类使用,用来在它的基础上定义子类。
abstract class A {
  id = 1;
}
class B extends A {
  amount = 100;
}
const b = new B();
b.id; // 1
b.amount; // 100
2
3
4
5
6
7
8
9
上面示例中,A 是一个抽象类,B 是 A 的子类,继承了 A 的所有成员,并且可以定义自己的成员和实例化。
访问限定符
public:成员默认的都是公共的,可以被外部访问(可以继承)private: 只能类的内部访问 (不可以继承)protected:只能被类的内部和类的子类访问,受保护的(可以继承)
属性修饰符
readonly: 只读属性必须在声明时或构造函数里被初始化。static:静态属性,只能类调用的属性
类与接口
接口(interface)可以用于对【对象的形状(Shape)】进行描述,当然也可以使用interface 描述 class
- 接口声明使用
interface interfaceName { ... }
- 类使用某个接口,使用 implements 关键字
class className implements InterfaceName{ ... }
- 案例
interface Person {
  name: string;
}
class Tom implements Person {
  public name: string;
  constructor(name: string) {
    this.name = name;
  }
  say() {
    console.log(`my name is ${this.name}`);
  }
}
let tom = new Tom("Tom");
tom.say(); //my name is Tom
2
3
4
5
6
7
8
9
10
11
12
13
14
函数
函数的定义
function add(x: number, y: number = 10, z?: number, ...rest: number[]): number {
  return [x, y, z, ...rest].reduce((a: number, b: number) => a + b);
}
let result = add(1, 2, 3, 5, 6, 7);
console.log(result); // 24
2
3
4
5
上面函数接受参数x、y 和一个可选参数 z,和一个number类型的集合,返回一个 number 类型的值。
x: number:定义参数类型y = 10:定义参数默认值z?: string:定义可选参数...rest: number[]: 接受剩余参数
函数的类型
type addType = (num1: number, num2: number) => number;
// 定义函数的入参和返回值的类型。
const add: addType = function (num1, num2) {
  return num1 + num2;
};
2
3
4
5
函数表达式
let mySum: (x: number, y: number) => number = function (x: number, y: number): number {
  return x + y;
};
let result = mySum(1, 2);
console.log(result); //3
2
3
4
5
不要把 TS 的箭头和 ES6 的箭头函数混淆。
上面代码可以=号为分界点来理解
=左部分:定义了一个mySum变量,它表示一个函数,接受number类型的 x 、y,最后返回值也是number=右部分:一个函数,接受number类型的x和y,返回值是number类型
上面的代码也可以写成箭头函数的形式:
let mySum: (x: number, y: number) => number = (
  x: number,
  y: number
): number => {
  return x + y;
};
let result = mySum(1, 2);
console.log(result); //3
2
3
4
5
6
7
8
重载
重载允许一个函数接受不同数量或类型的参数时,作出不同的处理。
比如,我们需要实现一个函数 reverse,输入数字 123 的时候,输出反转的数字 321,输入字符串 'hello' 的时候,输出反转的字符串 'olleh'。
利用联合类型,我们可以这么实现:
function reverse(x: number | string): number | string {
  if (typeof x === "number") {
    return Number(x.toString().split("").reverse().join(""));
  } else if (typeof x === "string") {
    return x.split("").reverse().join("");
  }
}
2
3
4
5
6
7
然而这样有一个缺点,就是不能够精确的表达,输入为数字的时候,输出也应该为数字,输入为字符串的时候,输出也应该为字符串。
这时,我们可以使用重载定义多个 reverse 的函数类型:
function reverse(x: number): number;
function reverse(x: string): string;
function reverse(x: number | string): number | string {
  if (typeof x === "number") {
    return Number(x.toString().split("").reverse().join(""));
  } else if (typeof x === "string") {
    return x.split("").reverse().join("");
  }
}
2
3
4
5
6
7
8
9
上例中,我们重复定义了多次函数 reverse,前几次都是函数定义,最后一次是函数实现。在编辑器的代码提示中,可以正确的看到前两个提示。
注意,TypeScript 会优先从最前面的函数定义开始匹配,所以多个函数定义如果有包含关系,需要优先把精确的定义写在前面。
类型断言
类型断言(Type Assertion)可以用来手动指定一个值的类型。
什么是断言
有些情况下 TS 并不能正确或者准确得推断类型,这个时候可能产生不必要的警告或者报错。 当你比 TS 的更清楚某些值的类型时:
let Cat = {};
Cat.name = "Kiti"; // Error Property 'name' does not exist on type '{}'
Cat.age = 6; // Error Property 'name' does not exist on type '{}'
2
3
当你知道这个 Cat 对象有 name 和 age 时,但是 TS 编译就是不通过, 怎么办? 这个时候就需要用到 类型断言 我们可以这写
interface ICat {
  name: string;
  age: number;
}
let Cat = {} as ICat;
Cat.name = "Kiti";
Cat.age = 6;
2
3
4
5
6
7
断言类型两种写法
尖括号
let someValue: any = "this is a string";
let strLength: number = (<string>someValue).length; // 临时把 someValue 断言为一个string 类型的值
2
as
let someValue: any = "this is a string";
let strLength: number = (someValue as string).length; //  临时把 someValue 断言为一个string 类型的值
2
将任何一个类型断言成 any
但有的时候,我们非常确定这段代码不会出错,比如下面这个例子:
window.foo = "foo"; // index.ts:1:8 - error TS2339: Property 'foo' does not exist on type 'Window & typeof globalThis'.
当我们向 window 添加一个 foo 时,会报错示我们 window 上不存在 foo 属性。
此时我们可以使用 as any 临时将 window 断言为 any 类型:
(window as any).foo = "foo";
临时将 window 断言为一个 any 类型,因为 any 可以添加任何的属性。 虽然这种方法可以解决诸如此类的问题,但是也可能会养成滥用 any 的习惯,所以慎用!
类型断言的限制
- 联合类型可以被断言为其中一个类型
- 父类可以被断言为子类
- 任何类型都可以被断言为
any any可以被断言为任何类型- 要使得 A 能够被断言为 B,只需要 A 兼容 B 或 B 兼容 A 即可
非空断言
可以使用非空断言操作符(!)来告诉编译器你确信表达式将不会为空。下面是一个例子:
let str: string | null = getSomeString();
let length = str.length;
2
上面代码在 ts 中会报错,因为 str 可能为空,为了使这行代码不报错,当你确定 str 肯定有 length 属性时,可以使用非空断言。
let str: string | null = getSomeString();
let length = str!.length;
2
这样就不会报错了,但是需要自己确保 str 有 length 属性。
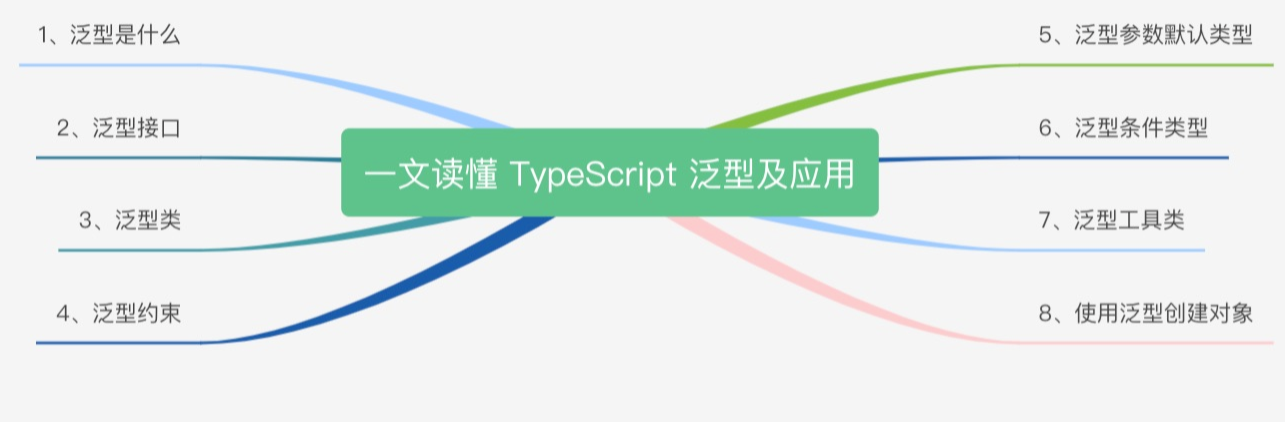
泛型
泛型(Generics)是指在定义函数、接口或类的时候,不预先指定具体的类型,而在使用的时候再指定类型的一种特性。
使用
function identity<T>(value: T): T {
  return value;
}

console.log(identity<Number>(1)); // 1
2
3
4
5
其中<T>就是传递的类型参数,用于特性函数调用的类型,类型也可以传递多个,使用<T, U>
function identity<T, U>(value: T, message: U): T {
  console.log(message);
  return value;
}
console.log(identity<Number, string>(68, "Semlinker"));
2
3
4
5
当然,现在的编译器足够聪明,调用的时候可以不传递类型,编译器可以自己识别的,传递类型时,这个类型在函数中使用时的方法/属性,必须是存在的,或者继承自某个接口。
比如不能使用 number 类型的数据获取 length,但是 array 却可以。
泛型带来的便利
function identity<T>(value: T): T{
  retrun value.toString()
}
cosole.log(identity<number>(42))// 42
cosole.log(identity("Hello!")) // Hello!
cosole.log(identity<number>([1,2,3]))// 1,2,3
2
3
4
5
6
泛型接口
可以为泛型提供一个用于约束参数/属性的类型的接口
函数
// 定义一个泛型接口
interface ListItem<T> {
  value: T;
  index: number;
}

// 定义一个泛型函数,该函数接受一个泛型参数 T
function processList<T>(items: ListItem<T>[]): void {
  items.forEach((item) => {
    console.log(`type: ${typeof item.value} Index: ${item.index}, Value: ${item.value}`);
  });
}

// 创建一个整数列表并处理
const intList = [
  { value: 1, index: 0 },
  { value: 2, index: 1 },
];
processList<number>(intList);

// 创建一个字符串列表并处理
const strList = [
  { value: "apple", index: 0 },
  { value: "banana", index: 1 },
];
processList<string>(strList);
2
3
4
5
6
7
8
9
10
11
12
13
14
15
16
17
18
19
20
21
22
23
24
25
26
在上面的例子中,我们首先定义了一个泛型接口 ListItem<T>,该接口具有两个属性:value 和 index,它们的类型是泛型参数 T。然后,我们定义了一个泛型函数 processList<T>,该函数接受一个类型为 ListItem<T>[] 的参数 items,并使用 forEach 方法遍历列表中的每个元素,并打印出每个元素的索引和值。
接下来,我们创建了一个整数列表 intList 和一个字符串列表 strList,并将它们传递给 processList 函数进行处理。通过使用泛型参数 T,我们可以在同一个函数中处理不同类型的列表。
类
// 定义一个泛型接口
interface List<T> {
  // 使用类型参数 T
  length: number;
  add(item: T): void;
  remove(item: T): boolean;
  get(index: number): T;
}

// 实现一个整数列表
class IntList implements List<number> {
  private items: number[] = [];

  get length(): number {
    return this.items.length;
  }

  add(item: number): void {
    this.items.push(item);
  }

  remove(item: number): boolean {
    const index = this.items.indexOf(item);
    if (index !== -1) {
      this.items.splice(index, 1);
      return true;
    } else {
      return false;
    }
  }

  get(index: number): number {
    return this.items[index];
  }
}

// 定义一个字符串列表
class StringList implements List<string> {
  private items: string[] = [];

  get length(): number {
    return this.items.length;
  }

  add(item: string): void {
    this.items.push(item);
  }

  remove(item: string): boolean {
    const index = this.items.indexOf(item);
    if (index !== -1) {
      this.items.splice(index, 1);
      return true;
    } else {
      return false;
    }
  }

  get(index: number): string {
    return this.items[index];
  }
}
2
3
4
5
6
7
8
9
10
11
12
13
14
15
16
17
18
19
20
21
22
23
24
25
26
27
28
29
30
31
32
33
34
35
36
37
38
39
40
41
42
43
44
45
46
47
48
49
50
51
52
53
54
55
56
57
58
59
60
61
62
在上面的例子中,我们定义了一个泛型接口 List<T>,其中 T 是一个类型参数。该接口具有四个属性和方法,其中 item 的类型是 T。然后,我们分别实现了两个类 IntList 和 StringList,它们都实现了 List<T> 接口,并使用具体的类型 number 和 string 分别替代了类型参数 T。这样,我们就可以使用泛型接口来创建不同类型的列表,而不需要为每种类型编写重复的代码。
泛型类
在类里使用泛型,只需要在类的后面,使用<T, ...>的语法定义任意多个类型变量,具体如下:
interface GenericInterface<U> {
  value: U;
  getIdentity: () => U;
}

class IdentityClass<T> implements GenericInterface<T> {
  value: T;
  constructor(value: T) {
    this.value = value;
  }
  getIdentity(): T {
    return this.value;
  }
}

const myNumberClass = new IdentityClass<Number>(68);
console.log(myNumberClass.getIdentity()); // 68

const myStringClass = new IdentityClass<string>("Semlinker!");
console.log(myStringClass.getIdentity()); // Semlinker!
2
3
4
5
6
7
8
9
10
11
12
13
14
15
16
17
18
19
20
接下来我们以实例化 myNumberClass 为例,来分析一下其调用过程:
- 在实例化
IdentityClass对象时,我们传入 Number 类型和构造函数参数值 68; - 之后在
IdentityClass类中,类型变量 T 的值变成 Number 类型; IdentityClass类实现了GenericInterface<T>,而此时 T 表示Number类型,因此等价于该类实现了GenericInterface<Number>接口;- 而对于
GenericInterface <U>接口来说,类型变量 U 也变成了Number。这里我有意使用不同的变量名,以表明类型值沿链向上传播,且与变量名无关。
类型别名的泛型写法
type Container<T> = { value: T };

const a: Container<number> = { value: 0 };
const b: Container<string> = { value: "b" };
2
3
4
泛型约束
确保属性存在
当我们在函数中获取length属性,在类型为number时,是没有length的,所以会报错。
function identity<T>(arg: T): T {
  console.log(arg.length);
  return arg;
}
identity<number>(1); //error
identity<number>([1, 2, 3]); //success
2
3
4
5
6
解决:使用接口约束属性
interface Length {
  length: number;
}

function identity<T extends Length>(arg: T): T {
  console.log(arg.length); // 可以获取length属性
  return arg;
}
2
3
4
5
6
7
8
检查对象上的键是否存在 先认识 keyof 操作符
类型断言 VS 泛型
举个例子:
function getCacheData(key: string): any {
  return (window as any).cache[key];
}

interface Cat {
  name: string;
  run(): void;
}

const tom = getCacheData("tom") as Cat;
tom.run();
2
3
4
5
6
7
8
9
10
11
还可以使用另外一种方法来解决这个问题
function getCacheData<T>(key: string): T {
  return (window as any).cache[key];
}

interface Cat {
  name: string;
  run(): void;
}

const tom = getCacheData<Cat>("tom");
tom.run();
2
3
4
5
6
7
8
9
10
11
通过给 getCacheData 函数添加了一个泛型 <T>,我们可以更加规范的实现对 getCacheData 返回值的约束,这也同时去除掉了代码中的 any,是最优的一个解决方案。
使用注意点
- 尽量少用泛型
- 类型参数越少越好
- 类型参数需要出现两次
- 泛型可以嵌套
泛型参考文章
模块
任何包含 import 或 export 语句的文件,就是一个模块(module)。
导入导出的语法和 ES6 一致,使用export 导出,使用import导入,ES6 支持的 TS 都支持。
导入 type 和 interface
// a.ts export
export interface A {
  foo: string;
}
export type B = String;
export const C = 123;
// b.ts import
import { type A, type B, C } from "./aa";
const a: A = { foo: "12" };
const b = "34";
console.log(a, b, C);
2
3
4
5
6
7
8
9
10
11
装饰器
装饰器(Decorator)是一种语法结构,用来在定义时修改类(class)的行为。
在语法上,装饰器有如下几个特征。
- (1)第一个字符(或者说前缀)是@,后面是一个表达式。
- (2)@后面的表达式,必须是一个函数(或者执行后可以得到一个函数)。
- (3)这个函数接受所修饰对象的一些相关值作为参数。
- (4)这个函数要么不返回值,要么返回一个新对象取代所修饰的目标对象。
装饰器一般只用来为类添加某种特定行为,用于给类本身或者类的方法、属性、访问器修改类的行为。
装饰器的结构
装饰器的函数类型定义如下:
type Decorator = (
  value: DecoratedValue,
  context: {
    kind: string;
    name: string | symbol;
    addInitializer?(initializer: () => void): void;
    static?: boolean;
    private?: boolean;
    access: {
      get?(): unknown;
      set?(value: unknown): void;
    };
  }
) => void | ReplacementValue;
2
3
4
5
6
7
8
9
10
11
12
13
14
上面代码中,Decorator 是装饰器的类型定义。它是一个函数,使用时会接收到 value 和 context 两个参数。
value:所装饰的对象。context:上下文对象,TypeScript 提供一个原生接口ClassMethodDecoratorContext,描述这个对象
function decorator(value: any, context: ClassMethodDecoratorContext) {
  // ...
}
2
3
上面是一个装饰器函数,其中第二个参数 context 的类型就可以写成 ClassMethodDecoratorContext。
context 对象的属性,根据所装饰对象的不同而不同,其中只有两个属性(kind 和 name)是必有的,其他都是可选的。
(1)
kind:字符串,表示所装饰对象的类型,可能取以下的值。 'class' 'method' 'getter' 'setter' 'field' 'accessor' 这表示一共有六种类型的装饰器。(2)
name:字符串或者 Symbol 值,所装饰对象的名字,比如类名、属性名等。(3)
addInitializer():函数,用来添加类的初始化逻辑。以前,这些逻辑通常放在构造函数里面,对方法进行初始化,现在改成以函数形式传入addInitializer()方法。注意,addInitializer()没有返回值。(4)
private:布尔值,表示所装饰的对象是否为类的私有成员。(5)
static:布尔值,表示所装饰的对象是否为类的静态成员。(6)
access:一个对象,包含了某个值的get和set方法。
装饰类
类装饰器的类型描述如下。
type ClassDecorator = (
  value: Function,
  context: {
    kind: "class";
    name: string | undefined;
    addInitializer(initializer: () => void): void;
  }
) => Function | void;
2
3
4
5
6
7
8
类装饰器接受两个参数:value(当前类本身)和 context(上下文对象)。其中,context 对象的 kind 属性固定为字符串 class。
类装饰器一般用来对类进行操作,可以不返回任何值,请看下面的例子。
function Greeter(value: any, context: ClassDecoratorContext) {
  if (context.kind === "class") {
    value.prototype.greet = function () {
      console.log("你好");
    };
  }
}

@Greeter
class User {
  [x: string]: any;
}

let u: User = new User();
u.greet(); // "你好"
2
3
4
5
6
7
8
9
10
11
12
13
14
15
- 类装饰器可以返回一个函数,替代当前类的构造方法。
- 类装饰器也可以返回一个新的类,替代原来所装饰的类。
装饰类的方法
方法装饰器用来装饰类的方法(method)。它的类型描述如下。
type ClassMethodDecorator = (
  value: Function,
  context: {
    kind: "method";
    name: string | symbol;
    static: boolean;
    private: boolean;
    access: { get: () => unknown };
    addInitializer(initializer: () => void): void;
  }
) => Function | void;
2
3
4
5
6
7
8
9
10
11
根据上面的类型,方法装饰器是一个函数,接受两个参数:value 和 context。
参数 value 是方法本身,参数 context 是上下文对象,有以下属性。
- kind:值固定为字符串 method,表示当前为方法装饰器。
- name:所装饰的方法名,类型为字符串或 Symbol 值。
- static:布尔值,表示是否为静态方法。该属性为只读属性。
- private:布尔值,表示是否为私有方法。该属性为只读属性。
- access:对象,包含了方法的存取器,但是只有 get()方法用来取值,没有 set()方法进行赋值。
- addInitializer():为方法增加初始化函数。
方法装饰器会改写类的原始方法,实质等同于下面的操作。
function trace(decoratedMethod) {
  // ...
}

class C {
  @trace
  toString() {
    return "C";
  }
}

// `@trace` 等同于
// C.prototype.toString = trace(C.prototype.toString);
2
3
4
5
6
7
8
9
10
11
12
13
上面示例中,@trace 是方法 toString()的装饰器,它的效果等同于最后一行对 toString()的改写。
- 如果方法装饰器返回一个新的函数,就会替代所装饰的原始函数。
class Person {
  name: string;
  constructor(name: string) {
    this.name = name;
  }

  @log
  greet() {
    console.log(`Hello, my name is ${this.name}.`);
  }
}

function log(originalMethod: any, context: ClassMethodDecoratorContext) {
  const methodName = String(context.name);

  function replacementMethod(this: any, ...args: any[]) {
    console.log(`LOG: Entering method '${methodName}'.`);
    const result = originalMethod.call(this, ...args);
    console.log(`LOG: Exiting method '${methodName}'.`);
    return result;
  }

  return replacementMethod;
}

const person = new Person("张三");
person.greet();
// "LOG: Entering method 'greet'."
// "Hello, my name is 张三."
// "LOG: Exiting method 'greet'."
2
3
4
5
6
7
8
9
10
11
12
13
14
15
16
17
18
19
20
21
22
23
24
25
26
27
28
29
30
装饰类的属性
属性装饰器用来装饰定义在类顶部的属性(field)。它的类型描述如下。
type ClassFieldDecorator = (
  value: undefined,
  context: {
    kind: "field";
    name: string | symbol;
    static: boolean;
    private: boolean;
    access: { get: () => unknown; set: (value: unknown) => void };
    addInitializer(initializer: () => void): void;
  }
) => (initialValue: unknown) => unknown | void;
2
3
4
5
6
7
8
9
10
11
注意,装饰器的第一个参数 value 的类型是 undefined,这意味着这个参数实际上没用的,装饰器不能从 value 获取所装饰属性的值。另外,第二个参数 context 对象的 kind 属性的值为字符串 field,而不是“property”或“attribute”,这一点是需要注意的。
属性装饰器要么不返回值,要么返回一个函数,该函数会自动执行,用来对所装饰属性进行初始化。该函数的参数是所装饰属性的初始值,该函数的返回值是该属性的最终值。
function logged(value: any, context: any) {
  const { kind, name } = context;
  if (kind === "field") {
    return function (initialValue) {
      console.log(`initializing ${name} with value ${initialValue}`);
      return initialValue;
    };
  }
}

class Color {
  @logged name = "green";
}

const color = new Color();
// "initializing name with value green"
2
3
4
5
6
7
8
9
10
11
12
13
14
15
16
上面示例中,属性装饰器@logged 装饰属性 name。@logged 的返回值是一个函数,该函数用来对属性 name 进行初始化,它的参数 initialValue 就是属性 name 的初始值 green。新建实例对象 color 时,该函数会自动执行。
属性装饰器的返回值函数,可以用来更改属性的初始值。
function twice(initialValue: any, context: any) {
  return (initialValue: number) => initialValue * 2;
}

class C {
  @twice
  field: number = 3;
}

const inst = new C();
console.log(inst.field);
// 6
2
3
4
5
6
7
8
9
10
11
12
上面示例中,属性装饰器@twice 返回一个函数,该函数的返回值是属性 field 的初始值乘以 2,所以属性 field 的最终值是 6。
装饰 getter、setter
用的不多 略
accessor 装饰器
用的不多 略
装饰器的执行顺序
装饰器的执行分为两个阶段。
(1)评估(evaluation):计算@符号后面的表达式的值,得到的应该是函数。
(2)应用(application):将评估装饰器后得到的函数,应用于所装饰对象。
也就是说,装饰器的执行顺序是,先评估所有装饰器表达式的值,再将其应用于当前类。
应用装饰器时,顺序依次为方法装饰器和属性装饰器,然后是类装饰器。
请看下面的例子。
function d(str: string) {
  console.log(`评估 @d(): ${str}`);
  return (value: any, context: any) => console.log(`应用 @d(): ${str}`);
}

function log(str: string) {
  console.log(str);
  return str;
}

@d("类装饰器") //1 9
class T {
  @d("静态属性装饰器") //2 7
  static staticField = log("静态属性值");

  @d("原型方法") //3 6
  [log("计算方法名")]() {} // 4

  @d("实例属性") // 5 8
  instanceField = log("实例属性值"); // 10
}
2
3
4
5
6
7
8
9
10
11
12
13
14
15
16
17
18
19
20
21
上面示例中,类 T 有四种装饰器:类装饰器、静态属性装饰器、方法装饰器、属性装饰器。
它的运行结果如下。
// "评估 @d(): 类装饰器"
// "评估 @d(): 静态属性装饰器"
// "评估 @d(): 原型方法"
// "计算方法名"
// "评估 @d(): 实例属性"
// "应用 @d(): 原型方法"
// "应用 @d(): 静态属性装饰器"
// "应用 @d(): 实例属性"
// "应用 @d(): 类装饰器"
// "静态属性值"
2
3
4
5
6
7
8
9
10
可以看到,类载入的时候,代码按照以下顺序执行。
- (1)装饰器评估:这一步计算装饰器的值,首先是类装饰器,然后是类内部的装饰器,按照它们出现的顺序。
注意,如果属性名或方法名是计算值(本例是“计算方法名”),则它们在对应的装饰器评估之后,也会进行自身的评估。
- (2)装饰器应用:实际执行装饰器函数,将它们与对应的方法和属性进行结合。
原型方法的装饰器首先应用,然后是静态属性和静态方法装饰器,接下来是实例属性装饰器,最后是类装饰器。
注意,“实例属性值”在类初始化的阶段并不执行,直到类实例化时才会执行。
如果一个方法或属性有多个装饰器,则内层的装饰器先执行,外层的装饰器后执行。
function bound() {
  return (value: any, context: any) => {
    console.log("bound");
  };
}
function log() {
  return (value: any, context: any) => {
    console.log("log");
  };
}
class Person {
  name: string;
  constructor(name: string) {
    this.name = name;
  }

  @bound()
  @log()
  greet() {
    console.log(`Hello, my name is ${this.name}.`);
  }
}
const coco = new Person("coco");
const cocoName = coco.greet();
/*
[LOG]: "log"
[LOG]: "bound"
[LOG]: "Hello, my name is coco."
*/
2
3
4
5
6
7
8
9
10
11
12
13
14
15
16
17
18
19
20
21
22
23
24
25
26
27
28
29
上面示例中,greet()有两个装饰器,内层的@log 先执行,外层的@bound 针对得到的结果再执行。
declare 关键字
declare 关键字用来告诉编译器,某个类型是存在的,可以在当前文件中使用。
它的主要作用,就是让当前文件可以使用其他文件声明的类型。举例来说,自己的脚本使用外部库定义的函数,编译器会因为不知道外部函数的类型定义而报错,这时就可以在自己的脚本里面使用 declare 关键字,告诉编译器外部函数的类型。这样的话,编译单个脚本就不会因为使用了外部类型而报错。
declare 关键字可以描述以下类型。
- 变量(const、let、var 命令声明)
- type 或者 interface 命令声明的类型
- class
- enum
- 函数(function)
- 模块(module)
- 命名空间(namespace)
- declare 关键字的重要特点是,它只是通知编译器某个类型是存在的,不用给出具体实现。比如,只描述函数的类型,不给出函数的实现,如果不使用 declare,这是做不到的。
declare 只能用来描述已经存在的变量和数据结构,不能用来声明新的变量和数据结构。另外,所有 declare 语句都不会出现在编译后的文件里面。
declare 可以用于 variable、function、class、module、namespace、global、enum 和外部的 module 类型声明文件
// declare 关键字可以给出外部变量的类型描述。
declare let x: number;

// declare 关键字可以给出外部函数的类型描述。
declare function sayHello(name: string): void;
sayHello("张三");

// declare 给出 class 类型描述的写法如下。
declare class Animal {
  constructor(name: string);
  eat(): void;
  sleep(): void;
}

// 如果想把变量、函数、类组织在一起,可以将 declare 与 module 或 namespace 一起使用。
declare namespace AnimalLib {
  class Animal {
    constructor(name: string);
    eat(): void;
    sleep(): void;
  }
  type Animals = "Fish" | "Dog";
} // 或者 declare module AnimalLib { class Animal { constructor(name:string); eat(): void; sleep(): void; } type Animals = 'Fish' | 'Dog'; }

// 如果要为 JavaScript 引擎的原生对象添加属性和方法,可以使用declare global {}语法。
export {};
declare global {
  interface window {
    myAppConfig: object;
  }
}
const config = window.myAppConfig;

// declare 关键字给出 enum 类型描述的例子如下,下面的写法都是允许的。
declare enum E1 {
  A,
  B,
}

declare enum E2 {
  A = 0,
  B = 1,
}

declare const enum E3 {
  A,
  B,
}

declare const enum E4 {
  A = 0,
  B = 1,
}
2
3
4
5
6
7
8
9
10
11
12
13
14
15
16
17
18
19
20
21
22
23
24
25
26
27
28
29
30
31
32
33
34
35
36
37
38
39
40
41
42
43
44
45
46
47
48
49
50
51
52
53
如何将 declare module 用于类型声明文件呢
在 TypeScript 中,你可以使用 declare module 来创建类型声明文件,以补充或扩展已有的 JavaScript 模块或库的类型信息。以下是如何使用 declare module 创建类型声明文件的一般步骤:
创建一个新的
.d.ts文件(类型声明文件),文件名可以与被声明的模块或库的文件名相同,只是后缀为.d.ts。在类型声明文件中使用
declare module来声明目标模块或库的类型。在
declare module中使用import或export来引入或导出需要的类型、接口、类、枚举等定义。
以下是一个示例,假设你要为一个名为 my-module 的 JavaScript 模块创建类型声明文件:
// my-module.d.ts

// 使用 declare module 来声明模块
declare module "my-module" {
  // 在模块内部定义需要的类型、接口等
  interface MyModuleOptions {
    option1: string;
    option2: number;
  }

  // 你还可以导出函数、类、枚举等
  export function myFunction(param: string): void;
  export class MyClass {
    constructor(name: string);
    sayHello(): string;
  }

  // 如果模块本身导出了一些内容,可以使用 import 语句来引入并导出
  import SomeType from "other-module";
  export { SomeType };
}
2
3
4
5
6
7
8
9
10
11
12
13
14
15
16
17
18
19
20
21
在这个示例中,我们创建了一个类型声明文件 my-module.d.ts,并使用 declare module 'my-module' 来声明模块 my-module 的类型信息。然后,在模块内部,我们定义了接口 MyModuleOptions、函数 myFunction、类 MyClass,并使用 export 将它们导出。还可以使用 import 语句来引入来自其他模块的类型,并导出它们。
接下来,当你在项目中导入 my-module 时,TypeScript 将能够识别和验证模块的类型信息,以提供更好的类型检查和智能提示。
确保将类型声明文件放在 TypeScript 项目中的正确位置,并且项目的 tsconfig.json 中包含了相应的配置来识别和处理类型声明文件。
d.ts 类型声明文件
单独使用的模块,一般会同时提供一个单独的类型声明文件(declaration file),把本模块的外部接口的所有类型都写在这个文件里面,便于模块使用者了解接口,也便于编译器检查使用者的用法是否正确。
类型声明文件里面只有类型代码,没有具体的代码实现。它的文件名一般为[模块名].d.ts的形式,其中的 d 表示 declaration(声明)。
举例来说,有一个模块的代码如下。
const maxInterval = 12;

function getArrayLength(arr) {
  return arr.length;
}

module.exports = {
  getArrayLength,
  maxInterval,
};
2
3
4
5
6
7
8
9
10
它的类型声明文件可以写成下面这样。
export function getArrayLength(arr: any[]): number;
export const maxInterval: 12;
2
类型声明文件也可以使用 export =命令,输出对外接口。下面是 moment 模块的类型声明文件的例子。
declare module "moment" {
  function moment(): any;
  export = moment;
}
2
3
4
上面示例中,模块 moment 内部有一个函数 moment(),而 export =表示 module.exports 输出的就是这个函数。
tsconfig.json
{
  "compilerOptions": {
    /* 基本选项 */
    "target": "es5", // 指定 ECMAScript 目标版本: 'ES3' (default), 'ES5', 'ES6'/'ES2015', 'ES2016', 'ES2017', or 'ESNEXT'
    "module": "commonjs", // 指定使用模块: 'commonjs', 'amd', 'system', 'umd' or 'es2015'
    "lib": [], // 指定要包含在编译中的库文件
    "allowJs": true, // 允许编译 javascript 文件
    "checkJs": true, // 报告 javascript 文件中的错误
    "jsx": "preserve", // 指定 jsx 代码的生成: 'preserve', 'react-native', or 'react'
    "declaration": true, // 生成相应的 '.d.ts' 文件
    "sourceMap": true, // 生成相应的 '.map' 文件
    "outFile": "./", // 将输出文件合并为一个文件
    "outDir": "./", // 指定输出目录
    "rootDir": "./", // 用来控制输出目录结构 --outDir.
    "removeComments": true, // 删除编译后的所有的注释
    "noEmit": true, // 不生成输出文件
    "importHelpers": true, // 从 tslib 导入辅助工具函数
    "isolatedModules": true, // 将每个文件做为单独的模块 (与 'ts.transpileModule' 类似).

    /* 严格的类型检查选项 */
    "strict": true, // 启用所有严格类型检查选项
    "noImplicitAny": true, // 在表达式和声明上有隐含的 any类型时报错
    "strictNullChecks": true, // 启用严格的 null 检查
    "noImplicitThis": true, // 当 this 表达式值为 any 类型的时候,生成一个错误
    "alwaysStrict": true, // 以严格模式检查每个模块,并在每个文件里加入 'use strict'

    /* 额外的检查 */
    "noUnusedLocals": true, // 有未使用的变量时,抛出错误
    "noUnusedParameters": true, // 有未使用的参数时,抛出错误
    "noImplicitReturns": true, // 并不是所有函数里的代码都有返回值时,抛出错误
    "noFallthroughCasesInSwitch": true, // 报告 switch 语句的 fallthrough 错误。(即,不允许 switch 的 case 语句贯穿)

    /* 模块解析选项 */
    "moduleResolution": "node", // 选择模块解析策略: 'node' (Node.js) or 'classic' (TypeScript pre-1.6)
    "baseUrl": "./", // 用于解析非相对模块名称的基目录
    "paths": {}, // 模块名到基于 baseUrl 的路径映射的列表
    "rootDirs": [], // 根文件夹列表,其组合内容表示项目运行时的结构内容
    "typeRoots": [], // 包含类型声明的文件列表
    "types": [], // 需要包含的类型声明文件名列表
    "allowSyntheticDefaultImports": true, // 允许从没有设置默认导出的模块中默认导入。

    /* Source Map Options */
    "sourceRoot": "./", // 指定调试器应该找到 TypeScript 文件而不是源文件的位置
    "mapRoot": "./", // 指定调试器应该找到映射文件而不是生成文件的位置
    "inlineSourceMap": true, // 生成单个 soucemaps 文件,而不是将 sourcemaps 生成不同的文件
    "inlineSources": true, // 将代码与 sourcemaps 生成到一个文件中,要求同时设置了 --inlineSourceMap 或 --sourceMap 属性

    /* 其他选项 */
    "experimentalDecorators": true, // 启用装饰器
    "emitDecoratorMetadata": true // 为装饰器提供元数据的支持
  }
}
2
3
4
5
6
7
8
9
10
11
12
13
14
15
16
17
18
19
20
21
22
23
24
25
26
27
28
29
30
31
32
33
34
35
36
37
38
39
40
41
42
43
44
45
46
47
48
49
50
51
52