React 基础知识
官方教程
React API
React.Component
定义组件的 Class 基类,返回一个 render(),其中是 JSX 描述的 DOM 结构,会通过 React.CreateElement()创建为真是的 DOM
React.mome
通过对比上一次和下一次的 props,提示渲染组件组件的性能,接受第二个参数为函数,可以控制对比过程
React.Fragment
可以使得组件在不创建额外 DOM 元素的情况下,让 render() 方法中返回多个元素,可以使用<>..</>代替。
React.forwardRef
React.forwardRed 会创建一个 React 组件,这个组件可以接受 ref 属性转发到其组件树下的另一个组件中,在以下两个场景时比较有用
- 转发 refs 到 DOM 组件中
- 在高阶组件中转发 refs
React.Refs
可以使用这个 API 访问 DOM 节点或者在 render 方法中创建 React 元素
在不同的组件中使用不同的 Ref 方法
- 在 Class 组件中使用 React.createRef
- 在函数组件中使用 React.forwardRef(或则 useRef)
编写一个自动聚焦的输入框
- Class Component
class NameForm extends React.Component {
    constructor(props) {
        super(props);
        this.inpRef = React.createRef();
    }
    componentDidMount() {
        this.inpRef.current.focus();
    }
    render() {
        return (
            <div>
                <input ref={this.inpRef}></input>
            </div>
        );
    }
}
ReactDOM.render(<NameForm />, document.getElementById("app"));
2
3
4
5
6
7
8
9
10
11
12
13
14
15
16
17
- Function Component(Hook)
function NameForm() {
    const inpRef = React.useRef(null);
    React.useEffect(() => {
        inpRef.current.focus();
    }, []);
    return <input ref={inpRef}></input>;
}

ReactDOM.render(<NameForm />, document.getElementById("app"));
2
3
4
5
6
7
8
9
JSX
JSX 是通过 JS 编写 HTML 结构的语法。
function App() {
    return <p className="title">hello world</p>;
}

ReactDOM.render(<APP />, document.getElementById("root"));
2
3
4
5
通过 React.render(<App/>, root) 将虚拟 DOM 转化为真实的 DOM 节点,并挂载到指定的节点上
而第一个参数必须有一个子节点,如果不提供可以使用 React.Fragments 或者<>...</>替代。
而在这一步中,经过 Babel 转换后的代码如下:
function App() {
    return React.createElement("p", { className: "title" }, "hello world");
}

ReactDOM.render(
    React.createElement(APP, null),
    document.getElementById("root")
);
2
3
4
5
6
7
8
- React.createElement 是 JSX 的语法糖,会把 JSX 语法转换为虚拟 DOM
- React.render 会将虚拟 DOM 转化为真实的 DOM,并挂在指定的元素上
样式处理
style 处理
- 接收一个对象作为样式的集合
- 将-链接改为小驼峰(如:font-size=>fontSize)
- 非数字的加引号改为字符串(如:red=>"red")
class Colorful extends React.Component {
    style = {
        fontSize: "72px",
        color: "red",
    };
    render() {
        return <div style={this.style}>Big Red</div>;
    }
}
2
3
4
5
6
7
8
9
Class 处理
- class 要改为 className
事件处理
- 事件命名采用小驼峰式(onClick)
- 使用 JSX 语法时应该传入一个函数(箭头函数或者确保 this 正确的函数),而不是一个字符串
// 创建是秃头
class MessageBox extends React.Component {
    alertMe() {
        alert("你刚才点了我一下。。。。");
    }

    render() {
        return (
            <div>
                <h2 onClick={this.alertMe}>我会弹窗</h2>
                <h2
                    onClick={(e) => {
                        e.preventDefault();
                    }}
                >
                    禁止弹窗
                </h2>
            </div>
        );
    }
}
// 渲染
ReactDOM.render(<MessageBox />, document.getElementById("app"), function () {
    console.log("渲染完成啦!!");
});
2
3
4
5
6
7
8
9
10
11
12
13
14
15
16
17
18
19
20
21
22
23
24
25
条件处理
- 通过 if-else 去判断
function Demo(props) {
    let dom;
    if (props.isShow) {
        return <h1>Message!</h1>;
    } else {
        return <h1></h1>;
    }
}

ReactDOM.render(<Demo isShow={true} />, document.getElementById("app"));
2
3
4
5
6
7
8
9
10
- 元素变量
class Demo extends React.Component {
    constructor(props) {
        super(props);
        this.state = { isShow: true };
    }

    render() {
        let isShow = this.state.isShow;
        let button;
        if (isShow) {
            button = <div>你好</div>;
        } else {
            button = <div>世界</div>;
        }

        return (
            <div>
                {button}
                <button
                    onClick={() =>
                        this.setState({ isShow: !this.state.isShow })
                    }
                >
                    Change
                </button>
            </div>
        );
    }
}

ReactDOM.render(<Demo />, document.getElementById("app"));
2
3
4
5
6
7
8
9
10
11
12
13
14
15
16
17
18
19
20
21
22
23
24
25
26
27
28
29
30
31
- 与运算符 &&
条件一 && 条件二:条件一为真就展示条件二,条件一位假,就不展示。
编写一个展示水果数据,没有的时候就不显示。
function List(props) {
    let { list } = props;
    return <div>{list.length !== 0 && <p>{list.toString()}</p>}</div>;
}

function Demo(props) {
    return (
        <div>
            <List list={["苹果", "香蕉"]} />
            <List list={[]} />
            <List list={["橘子", "凤梨"]} />
        </div>
    );
}

ReactDOM.render(<Demo />, document.getElementById("app"));
2
3
4
5
6
7
8
9
10
11
12
13
14
15
16
- 三目运算符
还用水果列表
function List(props) {
    let { list } = props;
    return (
        <div>
            {list.length === 0 ? <p>--无数据--</p> : <p>{list.toString()}</p>}
        </div>
    );
}

function Demo(props) {
    return (
        <div>
            <List list={["苹果", "香蕉"]} />
            <List list={[]} />
            <List list={["橘子", "凤梨"]} />
        </div>
    );
}

ReactDOM.render(<Demo />, document.getElementById("app"));
2
3
4
5
6
7
8
9
10
11
12
13
14
15
16
17
18
19
20
- 阻止组件渲染
判断条件,适当的返回 null 即可
function List(props) {
    let { list } = props;
    if (list.length === 0) {
        return null;
    }
    return (
        <div>
            <p>{list.toString()}</p>
        </div>
    );
}

function Demo(props) {
    return (
        <div>
            <List list={["苹果", "香蕉"]} />
            <List list={[]} />
            <List list={["橘子", "凤梨"]} />
        </div>
    );
}

ReactDOM.render(<Demo />, document.getElementById("app"));
2
3
4
5
6
7
8
9
10
11
12
13
14
15
16
17
18
19
20
21
22
23
列表 && Key
可以使用 map 渲染多个列表
key 可以帮助 React 识别哪些元素改变了,比如删除或者添加,给每个元素唯一的标示,一般使用 id 或者 index。
function List(props) {
    let { list } = props;
    return (
        <div>
            <h3>水果列表</h3>
            <ul>
                {list.map((e, i) => (
                    <li key={i}>{e}</li>
                ))}
            </ul>
        </div>
    );
}

function Demo(props) {
    return (
        <div>
            <List list={["苹果", "香蕉"]} />
            <List list={["橘子", "凤梨"]} />
        </div>
    );
}

ReactDOM.render(<Demo />, document.getElementById("app"));
2
3
4
5
6
7
8
9
10
11
12
13
14
15
16
17
18
19
20
21
22
23
24
表单
受控组件:如 input、textarea、select 通常维护自己的 state,并且根据用户输入进行更新,通过 setState 更新。
在 HTML 中,标签
<input>、<textarea>、<select>的值的改变通常是根据用户输入进行更新。在 React 中,可变状态通常保存在组件的状态属性中,并且只能使用 setState() 更新,而呈现表单的 React 组件也控制着在后续用户输入时该表单中发生的情况,以这种由 React 控制的输入表单元素而改变其值的方式,称为:“受控组件”。
————————————————
原文链接:https://blog.csdn.net/qq_41846861/article/details/86598797
实现一个简单的 input 绑定
class MyInput extends React.Component {
    constructor(props) {
        super(props);
        this.state = {
            val: "",
        };
        this.handleChange = this.handleChange.bind(this);
    }
    handleChange(event) {
        this.setState({
            val: event.target.value,
        });
    }
    render() {
        return (
            <div>
                <input value={this.state.val} onChange={this.handleChange} />
                <h1>{this.state.val}</h1>
            </div>
        );
    }
}
2
3
4
5
6
7
8
9
10
11
12
13
14
15
16
17
18
19
20
21
22
使用表单和列表编写一个可以添加的表单列表
class NameForm extends React.Component {
    constructor(props) {
        super(props);
        this.state = { value: "", list: [1, 2] };
    }

    handleChange = (event) => {
        this.setState({ value: event.target.value });
    };

    handleSubmit = (event) => {
        this.setState({ list: [...this.state.list, this.state.value] });
        console.log(this.state.list, this.state.value);
        event.preventDefault();
    };

    render() {
        let { list } = this.state;
        return (
            <div>
                <form onSubmit={this.handleSubmit}>
                    <label>
                        Name:
                        <input
                            type="text"
                            value={this.state.value}
                            onChange={this.handleChange}
                        />
                    </label>
                    <input type="submit" value="Submit" />
                </form>
                <List list={list} />
            </div>
        );
    }
}

function List(props) {
    let list = props.list;
    // return <p>{list.toString()}</p>
    return (
        <ul>
            {list.map((e, i) => {
                return <li key={i}>{e}</li>;
            })}
        </ul>
    );
}

ReactDOM.render(<NameForm />, document.getElementById("app"));
2
3
4
5
6
7
8
9
10
11
12
13
14
15
16
17
18
19
20
21
22
23
24
25
26
27
28
29
30
31
32
33
34
35
36
37
38
39
40
41
42
43
44
45
46
47
48
49
50
组件
组件的使用直接嵌入组件即可:
props<object>:组件内接受到的值,可以使用componentName.defaultProps = {value: 0},设置默认值,需规范 props 的类型和是否必要时,请使用prop-typestate<object>:组件内的状态,可以使用this.setState({value:0}),改变(覆盖)state,并更新到 DOM
PS:组件的 props 不可更改!
class 组件
需要从 React.Component 上继承,有 state,和 props,有生命周期。
class List extends React.Component {
    constructor(props){
        super(props)
    }
    render(){
       const {list} = this.props;
        return
        <div>
            {list.map((item,index)=>{
               return
               <li key={item.id}>
                  <span>{item.title}</span>
               </li>
             })}
        <div>
    }
}
2
3
4
5
6
7
8
9
10
11
12
13
14
15
16
17
特点
- 有组件实例
- 有生命周期
- 有 state 和 setState
函数组件
直接写一个函数,接收 props(相当于函数参数),
function List(props){
    const list = props;
    reutrn <ul>
           {list.map((item,index)=>{
            return <li key={item.id}>
               {item.title}
            </li>
           })}
     </ul>
}
2
3
4
5
6
7
8
9
10
11
特点
- 没有组件实例
- 没有生命周期
- 没有 state 和 setState,只有 props
- 不要更改 props
Props
设置默认的 props
class Greeting extends React.Component {
    render() {
        return <h1>Hello, {this.props.name}</h1>;
    }
}

// 指定 props 的默认值:
Greeting.defaultProps = {
    name: "Stranger",
};

// 渲染出 "Hello, Stranger":
ReactDOM.render(<Greeting />, document.getElementById("example"));
1
2
3
4
5
6
7
8
9
10
11
12
13如何校验 props
import PropTypes from "prop-types";

function HelloWorldComponent({ name }) {
    return <div>Hello, {name}</div>;
}

HelloWorldComponent.propTypes = {
    name: PropTypes.string,
};

export default HelloWorldComponent;
1
2
3
4
5
6
7
8
9
10
11传入一个回调函数(子组件修改父组件的值)
class MyApp extends React.Component {
    constructor(props) {
        super(props);
        this.state = {
            inputValue: "",
        };
        this.handleChange = this.handleChange.bind(this);
    }
    handleChange(event) {
        this.setState({
            inputValue: event.target.value,
        });
    }
    render() {
        return (
            <div>
                {/* 修改这行下面的代码 */}
                <GetInput
                    input={this.state.inputValue}
                    handleChange={this.handleChange}
                />
                <RenderInput input={this.state.inputValue} />
                {/* 修改这行上面的代码 */}
            </div>
        );
    }
}

class GetInput extends React.Component {
    constructor(props) {
        super(props);
    }
    render() {
        return (
            <div>
                <h3>Get Input:{this.props.input}</h3>
                <input
                    value={this.props.input}
                    onChange={this.props.handleChange}
                />
            </div>
        );
    }
}

class RenderInput extends React.Component {
    constructor(props) {
        super(props);
    }
    render() {
        return (
            <div>
                <h3>Input Render:{this.props.input}</h3>
                <p>{this.props.input}</p>
            </div>
        );
    }
}
1
2
3
4
5
6
7
8
9
10
11
12
13
14
15
16
17
18
19
20
21
22
23
24
25
26
27
28
29
30
31
32
33
34
35
36
37
38
39
40
41
42
43
44
45
46
47
48
49
50
51
52
53
54
55
56
57
58
State 和生命周期
state
类似 Vue 中的 data,数据改变会同步更新到 DOM,任何组件的 state 都是私有的(可以使用 props 传递),state 只存在 Class 组件中。
更改 state 时,不可以直接this.state.value = newValue,而需要使用this.setState({value: newValue}),去替换原值。
异步的 state,出于对性能的考虑,React 会合并个多 this.setState 操作一起调用,
数据向下的,state 是局部的私有的,出了拥有并且使用 props 传递的组件,其他组件都无法访问
// 创建时钟
class Clock extends React.Component {
    constructor(props) {
        super(props);
        this.state = { date: new Date() };
    }
    // 组件挂载
    componentDidMount() {
        this.timer = setInterval(this.tick.bind(this), 1000);
    }
    // 组件卸载
    componentWillUnmount() {
        clearInterval(this.timer);
    }
    // 时间更新
    tick() {
        this.setState({ date: new Date() });
    }
    render() {
        return (
            <h2>{`${this.state.date.toLocaleDateString()} ${this.state.date.toLocaleTimeString()}`}</h2>
        );
    }
}
// 渲染
ReactDOM.render(<Clock />, document.getElementById("app"), function () {
    console.log("渲染完成啦!!");
});
2
3
4
5
6
7
8
9
10
11
12
13
14
15
16
17
18
19
20
21
22
23
24
25
26
27
28
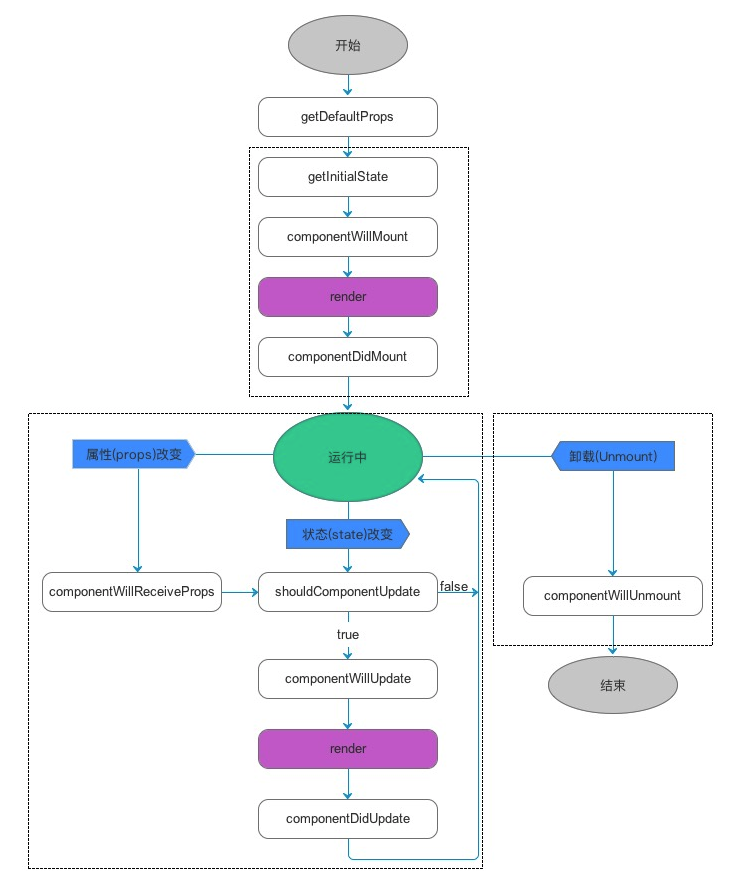
生命周期
和 Vue 一样,在不同阶段触发不同的钩子,但是生命周期仅在 Class 组件中存在。
componentWillMount组件挂载之前 (render 方法调用前执行)componentDidMount组件挂载之后(render 方法调后执行,通常在这里发送 http 请求、添加事件等)shouldComponentUpdate组件更新之前优化渲染:默认情况下,当 props 和 state 发生变化时,组件会进行重新渲染以及更新自己的子组件。但是如果收到新的值和上一次的值相同时,也会出发更新操作。这时可以通过
shouldComponentUpdate(nextProps, nextState)对比老的 props 和 state,返回true则继续更新,false则停止更新。componentDidUpdate组件更新之后componentWillUnmount组件卸载时(卸载事件、清楚定时器等)
参考:React-生命周期open in new window
Hook
React V16.8 新增的特性。
提供了如何在不使用 Class 组件的情况下使用 state 特性
参考文章:React Hook 丨用好这 9 个钩子,所向披靡open in new window
useState
替代之前的 this.setState,每次都有通过前面的 setValue 方法去设置值
function Example() {
    // 声明一个“count”的state变量
    const [count, setCount] = useState(0); // count 的默认值是 0

    return (
        <div>
            <p>You clicked {count} times</p>
            <button onClick={() => setCount(count + 1)}>Click me</button>
        </div>
    );
}
// 每次点击时 count + 1
2
3
4
5
6
7
8
9
10
11
12
useEffect
替代之前的生命周期,默认每次在视图更新时执行。
useEffect(() => {
    document.title = `You clicked ${count} times`;
});
// 相当于 组件挂载和组件更新(任何组件)时的生命周期都会触发它的更新

useEffect(() => {
    document.title = `You clicked ${count} times`;
}, []);
// 只会在第一次加载时候触发一次

useEffect(() => {
    document.title = `You clicked ${count} times`;
}, [count]);
// 仅在 count 更新时,触发一次。
2
3
4
5
6
7
8
9
10
11
12
13
14
如果需要设置清除 effect 可以 return 一个清除函数,这个函数将在组件卸载时执行(类似 componentWillUnmount 生命周期)
function FunctionComponents(props) {
  useEffect(() => {
    // 在每次更新的时候都运行Effice
    State.subscribeStatus(props.id, handleStatusChange);
    return () => {
      // 在组件卸载的时候执行清除操作
      State.unsubscribeStatus(props.id, handleStatusChange);
    };
  });
2
3
4
5
6
7
8
9
10
具体参考:React 函数式组件值之 useEffect()open in new window
useCallback
const memoizedCallback = useCallback(() => {
    doSomething(a, b);
}, [a, b]);

useEffect(() => {
    fun();
});
2
3
4
5
6
7
只有当 a 或 b 改变的时候,函数 memoizedCallback 才执行。
把内联回调函数及依赖项数组作为参数传入 useCallback,它将返回该回调函数的 memoized 版本,该回调函数仅在某个依赖项改变时才会更新。当你把回调函数传递给经过优化的并使用引用相等性去避免非必要渲染(例如 shouldComponentUpdate)的子组件时,它将非常有用。 useCallback(fn, deps) 相当于 useMemo(() => fn, deps)
useContext
提供一种在组件之间共享此类值的方式,而不必显式的通过 props 去传递
const obj = {
    value: 1,
};
const obj2 = {
    value: 2,
};

const ObjContext = React.createContext(obj);
const Obj2Context = React.createContext(obj2);

const App = () => {
    return (
        <ObjContext.Provider value={obj}>
            <Obj2Context.Provider value={obj2}>
                <ChildComp />
            </Obj2Context.Provider>
        </ObjContext.Provider>
    );
};
// 子级
const ChildComp = () => {
    return <ChildChildComp />;
};
// 孙级或更多级
const ChildChildComp = () => {
    const obj = useContext(ObjContext);
    const obj2 = useContext(Obj2Context);
    return (
        <>
            <div>{obj.value}</div>
            <div>{obj2.value}</div>
        </>
    );
};
2
3
4
5
6
7
8
9
10
11
12
13
14
15
16
17
18
19
20
21
22
23
24
25
26
27
28
29
30
31
32
33
34
useRef
我们用它来访问 DOM,从而操作 DOM,如点击按钮聚焦文本框:
const Index = () => {
    const inputEl = useRef(null);
    const handleFocus = () => {
        inputEl.current.focus();
    };
    return (
        <>
            <input ref={inputEl} type="text" />
            <button onClick={handleFocus}>Focus</button>
        </>
    );
};
2
3
4
5
6
7
8
9
10
11
12
注意:返回的 ref 对象在组件的整个生命周期内保持不变。 它类似于一个 class 的实例属性,我们利用了它这一点。 动手滑到上面再看上面看那个有 useRef 的例子。
刚刚举例的是访问 DOM,那如果我们要访问的是一个组件,操作组件里的具体 DOM 呢?我们就需要用到 React.forwardRef 这个高阶组件,来转发 ref,如:
const Index = () => {
    const inputEl = useRef(null);
    const handleFocus = () => {
        inputEl.current.focus();
    };
    return (
        <>
            <Child ref={inputEl} />
            <button onClick={handleFocus}>Focus</button>
        </>
    );
};

const Child = forwardRef((props, ref) => {
    return <input ref={ref} />;
});
2
3
4
5
6
7
8
9
10
11
12
13
14
15
16
useMemo
作用: 首先 useMemo 它使用来做缓存用的,只有当一个依赖项改变的时候才会发生变化,否则拿缓存的值,就不用在每次渲染的时候再做计算,它仅会在某个依赖项改变时才重新计算 memoized 值。 这种优化有助于避免在每次渲染时都进行高开销的计算。如果没有提供依赖项数组,useMemo 在每次渲染时都会计算新的值。
场景: 既然是用作缓存来用,那场景就可能有:
比如说当你登陆之后,你的个人信息一般是不会变的,当你退出登陆,重新输入另外一个人的账号密码之后,这个时候个人信息可能就变了,那这样我就可以把账号和密码两个作为依赖项,当他们变了,那就更新个人信息,否则拿缓存的值,从而达到优化的目的。
React 源码分析
以下总结内容均来自:
React 理念篇
我们认为,React 是用 JavaScript 构建快速响应的大型 Web 应用程序的首选方式。它在 Facebook 和 Instagram 上表现优秀。
而在 Web 端制约快速响应的因素主要是两个方便:
- CPU 的瓶颈(白屏、掉帧)
- I/O 的限制(网络的延迟)
那么 React 是如何解决这两个问题的呢? 首先 CPU 瓶颈是通过时间切片去解决的,而 I/O 的瓶颈是通过将同步的更新,改变成可中断的异步更新去解决的。
为了实现快速响应的理念,所以需要采用适合的架构,按照版本可分为三个架构:
- React 15(递归更新时无法中断)
- React 16()