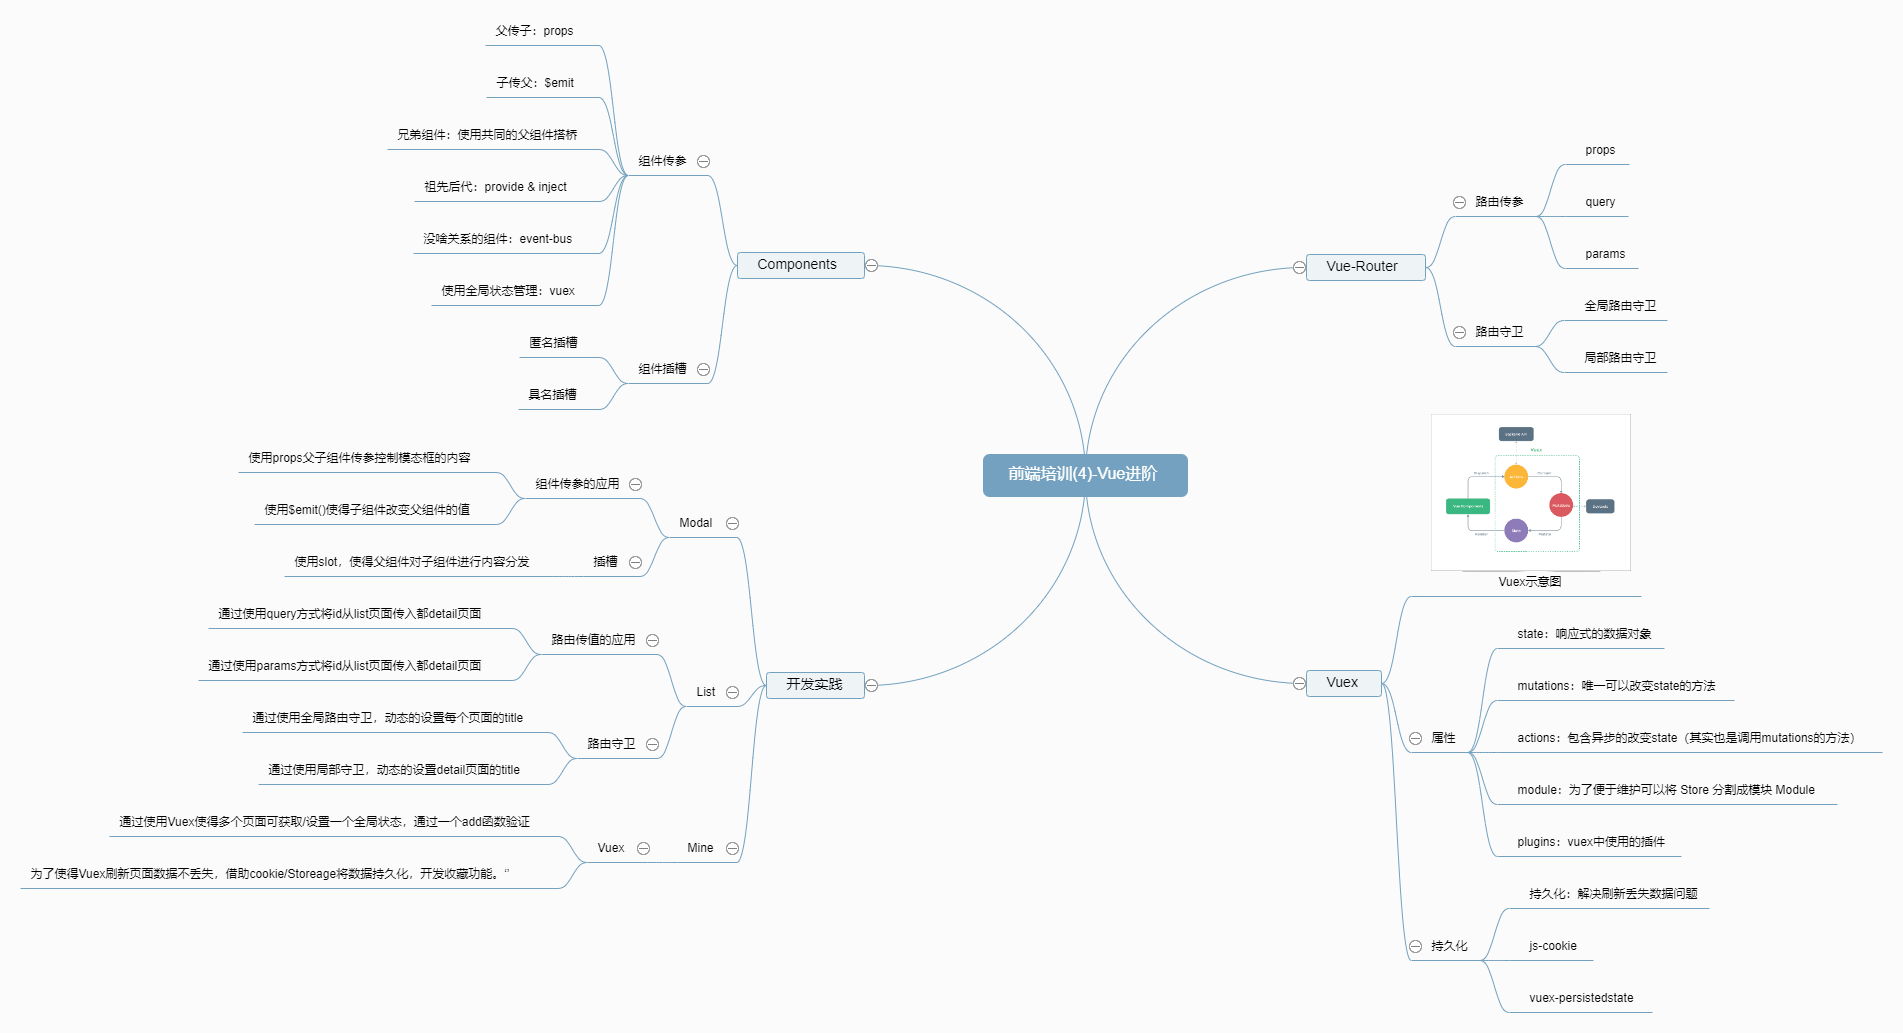
在 Vue 开发中,必须掌握的三个知识:
- 组件封装/使用/传参/插槽
- 路由传参/守卫
- Vuex 使用和持久化
通过开发三个小功能展示它们的使用方法和特点。
火狐浏览器 Vue-devtools 地址:链接open in new window
Components
组件化:简答来说,组件可以扩展 HTML 元素,封装可重用的代码,复用代码提升效率。
组件(Modal)
从封装一个模态框组件开始;
父传子
子组件给父组件传值,使用
props。
通过给子组件传值,可以使得组件跟随父组件库的状态的变化而变化,使得组件的数据动态性变得更高。
添加功能
- 定义弹框组件的显示/隐藏状态
- 定时弹框组件的 title
- 定义弹框组件的 content
子组件代码:
// components/Modal.vue
<template>
  <div class="wrap" v-show="show">
    <h2>{{ title }}</h2>
    <div>{{ content }}</div>
  </div>
</template>
<script>
export default {
  props: {
    show: Boolean,
    title: String,
    content: String,
  }
};
</script>
<style lang="scss" scoped>
.wrap {
  width: 500px;
  height: 300px;
  position: fixed;
  top: 50%;
  left: 50%;
  margin-left: -250px;
  margin-top: -150px;
  border: solid #333 2px;
  text-align: center;
  border-radius: 5px;
  background: #c4c4c4;
}
</style>
2
3
4
5
6
7
8
9
10
11
12
13
14
15
16
17
18
19
20
21
22
23
24
25
26
27
28
29
30
31
父组件代码:
// /view/Home.vue
<template>
  <div class="home">
    <button @click="shouModal">切换</button>
    <Modal
      :show="isShowModal"
      title="我是标题"
      content="我是内容">
     </Modal>
  </div>
</template>
<script>
import Modal from "@/components/Modal.vue";
export default {
  components: { Modal },
  data() {
    return {
      isShowModal: false
    };
  },
  methods: {
    shouModal() {
      this.isShowModal = !this.isShowModal;
    }
  },
};
</script>
2
3
4
5
6
7
8
9
10
11
12
13
14
15
16
17
18
19
20
21
22
23
24
25
26
27
子传父
Vue 更推荐单向数据流,所以子组件像修改传递的数据,需要通知父组件来修改,使用$emit 触发父元素传递的事件,让父元素自己修改。
子组件代码:
// components/Modal.vue
<template>
  <div class="wrap" v-show="show">
    <h2>{{ title }}</h2>
    <div>{{ content }}</div>
    <div @click="close" class="close">x</div>
  </div>
</template>
<script>
export default {
  props: {
    show: Boolean,
    title: String,
    content: String,
  },
  mounted() {
    setTimeout(() => {
      this.show = false;
      // 三秒之后自己关闭
      // 可以修改,但是会有报错-不推荐
      // 子组件不能随意修改父组件的值
      // Avoid mutating a prop directly since the value will be overwritten whenever the parent component re-renders. Instead, use a data or computed property based on the prop's value. Prop being mutated: "show"
    }, 1000 * 3);
  },
  methods: {
    close() {
      // 通知父组件的close函数,让参数传入,让其自行修改。
      this.$emit("close", false);
    },
  },
};
</script>
<style lang="scss" scoped>
.wrap {
  ....
  .close {
    position: absolute;
    top: 0;
    right: 0;
    width: 60px;
    height: 60px;
    text-align: center;
    line-height: 60px;
    font-size: 35px;
    border-radius:50%;
    background: darkgrey;
  }
}
</style>
2
3
4
5
6
7
8
9
10
11
12
13
14
15
16
17
18
19
20
21
22
23
24
25
26
27
28
29
30
31
32
33
34
35
36
37
38
39
40
41
42
43
44
45
46
47
48
49
父组件代码:
// view/Home.vue
<template>
  <div class="home">
    <Modal
    :show="isShowModal"
    title="我是标题"
    content="我是内容"
    @close="close"
    >
    </Modal>
  </div>
</template>
<script>
export default {
  methods: {
    close(state){
      this.isShowModal = state;
      console.log(state);
    },
  },
};
</script>
2
3
4
5
6
7
8
9
10
11
12
13
14
15
16
17
18
19
20
21
22
为什么非要这样?子组件不能直接更改父组件的值吗? 答:因为 Vue 设计是单向数据流,数据的流动方向只能是自上往下的方向;
其他传参方法
- 兄弟组件:使用共同的父组件搭桥;brother1=》father=》brother2
- 祖先后代:provide & inject
- 没啥关系的组件:event-bus
- 使用全局响应式状态管理:vuex
插槽
插槽是 Vue 组件实现了一套内容分发的 API,将<slot>元素作为承载分发内容的出口。
子组件代码:
// components/Modal.vue
<template>
  <div class="wrap" v-show="show">
    <h2>{{ title }}</h2>
    <div>{{ content }}</div>
    <slot></slot> <!-- !父组件的内容会展示在这里! -->
  </div>
</template>
<script>
export default {
  props: {
    show: Boolean,
    title: String,
    content: String,
  }
};
</script>
2
3
4
5
6
7
8
9
10
11
12
13
14
15
16
17
父组件代码:
// view/Home.vue
<template>
      <Modal
        :show="isShowModal"
        title="我是标题"
        content="我是内容"
        @close="close"
        >
        <h1 class="red">我是插槽内容</h1>
      </Modal>
</template>
<style>
.red{
  color:red;
}
</style>
2
3
4
5
6
7
8
9
10
11
12
13
14
15
16
关于插槽的更多使用:Vue.js 中文官网-components-slotsopen in new window
Vue-Router(列表)
单页面特点:用于将 URL 和页面文件相对应起来
通过获取文章列表,进入列表详情开始;
路由传参
路由传参的三个方法
- props:每一个页面其实也可以当做一个组件来看待,自然可以使用 props 传值。但是缺点很明显,刷新页面会丢失(不推荐)。
- query:路由的路径传值,http://xx.com?id=1;获取:
this.$route.query.id - params:动态路由
user/123;必须有 name;获取:this.$route.params.id
添加功能
- 渲染文章 list 列表
- 点击文章拿到 id 然后跳转到文章详情页
- 通过 id 获取文章详情
query 传值
配置 router 文件:
// router/index.js
{
    path: '/detail',
    name: 'Detail',
    component: () => import('../views/Detail.vue')
}
2
3
4
5
6
list 页面:
//...template>div
 <ul>
  <li
    v-for="item in list"
    :key="item.id"
    :title="item.title"
    @click="toDetail(item)"
  >
    {{ item.title }}
  </li>
</ul>
// ... script> mothods
toDetail(item) {
     console.log(item.id);
     this.$router.push("/detail?id=" + item.id);
}
2
3
4
5
6
7
8
9
10
11
12
13
14
15
16
detail 页面:
// view/detail
<template>
  <div>
    <h1>{{ detailInfo.title }}</h1>
    <div v-html="detailInfo.content"></div>
  </div>
</template>
<script>
export default {
  data() {
    return {
      id: this.$route.query.id,
      detailInfo: {},
    };
  },
  mounted() {
    // this.id = this.$route.query.id;
    this.getDetail();
  },
  methods: {
    getDetail() {
      this.axios
        .get("/v1/topic/" + this.id)
        .then((result) => {
          console.log(result);
          this.detailInfo = result.data.data;
        })
        .catch((err) => {
          console.error(err);
        });
    },
  },
};
</script>
2
3
4
5
6
7
8
9
10
11
12
13
14
15
16
17
18
19
20
21
22
23
24
25
26
27
28
29
30
31
32
33
34
params 传值
配置 router 文件:
// router/index.js
{
    path: '/details/:id',
    name: 'Details',// 必须有
    component: () => import('../views/Details.vue')
  }
2
3
4
5
6
list 页面
//...template>div
 <ul>
  <li
    v-for="item in list"
    :key="item.id"
    :title="item.title"
    @click="toDetail(item)"
  >
    {{ item.title }}
  </li>
</ul>
// ... script> mothods
toDetail(item) {
     console.log(item.id);
     //this.$router.push("/detail?id=" + item.id);
     this.$router.push({ name: "Details", params: { id: item.id } });
}
2
3
4
5
6
7
8
9
10
11
12
13
14
15
16
17
details 页面
// view/Details.vue
<template>
  <div>
    <h1>{{ detailInfo.title }}</h1>
    <div v-html="detailInfo.content"></div>
  </div>
</template>
<script>
export default {
  data() {
    return {
      id: this.$route.params.id,// 获取值的变化
      detailInfo: {},
    };
  },
  mounted() {
    this.getDetail();
  },
  methods: {
    getDetail() {
      this.axios
        .get("/v1/topic/" + this.id)
        .then((result) => {
          console.log(result);
          this.detailInfo = result.data.data;
        })
        .catch((err) => {
          console.error(err);
        });
    },
  },
};
</script>
2
3
4
5
6
7
8
9
10
11
12
13
14
15
16
17
18
19
20
21
22
23
24
25
26
27
28
29
30
31
32
33
导航守卫
正如其名,vue-router 提供的导航守卫主要用来通过跳转或取消的方式守卫导航。有多种机会植入路由导航过程中:全局的, 单个路由独享的, 或者组件级的。
添加功能
- 全局守卫:动态的显示每个页面的 title
- 局部守卫:动态的每个详情页添加对应文章的 title,调试时给提示。
全局守卫
为静态路由添加动态的 title;通过 meta 定义每个页面的 title,在路由跳转时拦截获取并设置;
// router/index.js
import Vue from "vue";
import VueRouter from "vue-router";
import Home from "../views/Home.vue";
Vue.use(VueRouter);
const routes = [
  {
    path: "/",
    name: "Home",
    meta: {
      title: "首页",
    },
    component: Home,
  },
  {
    path: "/about",
    meta: {
      title: "关于我们",
    },
    name: "About",
    component: () => import("../views/About.vue"),
  },
];
// ...
router.beforeEach((to, from, next) => {
  console.log(to, from);
  let title = to.meta.title;
  document.title = title;
  next();
});
//...
2
3
4
5
6
7
8
9
10
11
12
13
14
15
16
17
18
19
20
21
22
23
24
25
26
27
28
29
30
31
局部守卫
为动态路由添加动态的 title;获取文章后动态的设置 title。
// view/details.vue
//script
  beforeRouteEnter(to, from, next) {
    console.log("路由改变", to, from);
    next((vm) => {
      setTimeout(() => {
        document.title = vm.detailInfo.title;
      }, 2000);
    });
  },
  beforeRouteLeave(to, from, next) {
    const answer = window.confirm("你确定跳转吗");
    if (answer) {
      next();
    } else {
      next(false);
    }
  },
2
3
4
5
6
7
8
9
10
11
12
13
14
15
16
17
18
Vuex(收藏)
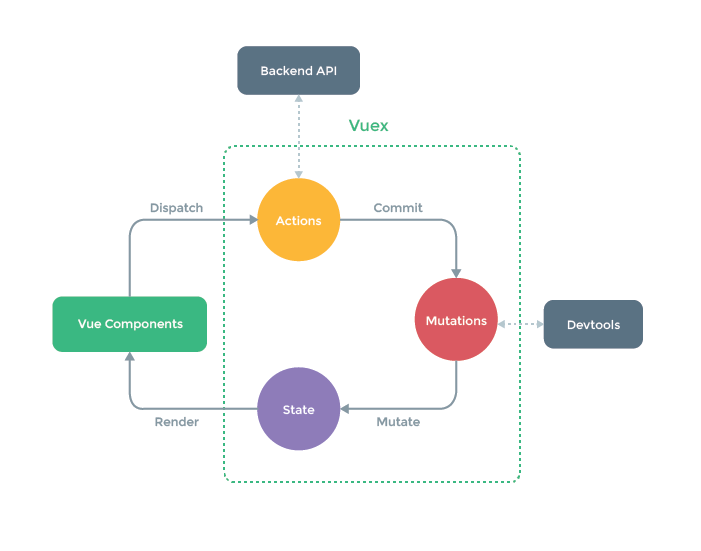
全局状态管理,单项数据流,比如用户信息、token、
添加功能:
- 写一个点赞功能,全局可以用。
- 写一个全局的收藏文章功能;并做持久化。
属性介绍
Vuex 属性一览
// /store/index.js
import Vue from "vue"; // 引入vue
import Vuex from "vuex"; // 引入vuex
import createPersistedState from "vuex-persistedstate"; // 引入插件
Vue.use(Vuex); // 使用vuex
export default new Vuex.Store({
  // vuex 仓库实例
  state: {}, // 具有响应式、全局可访问的的 一个对象
  mutations: {}, // !!唯一可以改变state的方法
  actions: {}, // 包含异步的改变state(其实也是调用mutations的方法)
  modules: {}, //  为了便于维护可以将 Store 分割成模块 Module
  plugins: [createPersistedState()], // veux 中使用的插件
});
2
3
4
5
6
7
8
9
10
11
12
13
使用
开发一个点赞功能,一个页面点击,一个页面展示点击后的数据
vuex 代码:
// store/index.js
import Vue from "vue";
import Vuex from "vuex";
Vue.use(Vuex);
export default new Vuex.Store({
  state: {
    faceNum: 0,
  },
  mutations: {
    addFace: (state) => state.faceNum++,
  },
});
2
3
4
5
6
7
8
9
10
11
12
首页页面代码:
// view/Home.vue
// template
<Button @click="addFace">颜值+1</Button>
// script methodes
addFace() {
      this.$store.commit("addFace"); // 提交一个变更
 }
2
3
4
5
6
7
我的页面代码
<div>颜值:{{ $store.state.faceNum }}</div>
缺点:刷新会丢失数据
持久化
因为 Vuex 刷新会丢失,所以有了持久化的方案,借助浏览器缓存,是的数据长期储存。
- cookie
- sessionStorage/localStorage
开发功能:开发一个收藏功能
- 文章页添加一个收藏按钮
- 将收藏的文章展示在我的页面中
- 点击跳转到收藏的文章
使用vuex-persistedstate做持久化吗,下载
yarn add vuex-persistedstate
or
npm install --save vuex-persistedstate
2
3
vuex 代码
import Vue from "vue";
import Vuex from "vuex";
import createPersistedState from "vuex-persistedstate";
Vue.use(Vuex);
export default new Vuex.Store({
  state: {
    faceNum: 0,
    collectionList: [],
  },
  mutations: {
    addFace: (state) => state.faceNum++,
    addCollectionList: (state, item) => {
      state.collectionList.push(item);
    },
  },
  plugins: [createPersistedState()],
});
2
3
4
5
6
7
8
9
10
11
12
13
14
15
16
17
文章详情页代码
// Details.vue
// template>div
    <Button @click="addc">收藏</Button>
// script>methods
 addc() {
    this.$store.commit("addCollectionList", {
      title: this.detailInfo.title,
      id: this.id,
    });
  }
2
3
4
5
6
7
8
9
10
我的页面代码
// view/about.vue
// template
  <ul>
    <li v-for="(item, ind) in collectionList" :key="ind">
      <router-link :to="{ path: '/Details/' + item.id }">
        {{ item.title }}
      </router-link>
    </li>
  </ul>
2
3
4
5
6
7
8
9
为什么要用 Vuex,不用 window 对象、sessionStorage/localStorage?
答:区别是响应式
练习
写代码,将上述功能都实现一遍。
参考: